THE ROADIE GUIDE

From first card.
To final clip.

Follow the workflow, learn a tool, or find the fix.
Search the full guide or choose a topic below.

47 topics

Start here

Your first show, from cards to clips

Follow this route for a complete night. Each Roadie page can also be used independently on an existing show.

  1. In Ingest, enter the show name and date, choose the destination SSD, and add a second drive if needed. Assign an angle to each selected card, then Import All Ready.
  2. When importing finishes, Roadie opens Sync + Rough Cut. Review angles, choose one Master audio source, and set the timeline layout and sizes.
  3. Open your editor. Choose an editor and sync method, set the rough cut, grade and markers, then click Build + Sync.
  4. In Edit Tools, apply angle fixes, add zooms in Resolve, find highlights, and copy the finished edit to social timelines.
  5. Place blue markers at the start and end of each clip. On Export, Scan Markers, Add to Render Queue, then Render. Enable Topaz and Deliver first if you want those stages to follow.
Roadie ingest controls on MacView full-size screenshot ↗Link to this answer ↗
Start here

What do I need to run Roadie?

The supplied Roadie 3.3 guide documents Mac setup: macOS 14 Sonoma or newer and Python 3 are required. Resolve workflows require DaVinci Resolve Studio with scripting enabled.

  1. Use Syncaila 3 only if you choose that sync engine; Roadie Sync does not require it.
  2. Topaz Video AI is optional for enhancement after rendering.
  3. For delivery, install and sign into Dropbox or Google Drive for desktop. Phone notifications use the optional ntfy app.

Roadie is available for Mac. Windows is in development. These setup requirements and screenshots describe the Mac build. Premiere Pro integration is beta; Final Cut Pro integration is in development.

Link to this answer ↗
Start here

Run the first-time Setup Check

The first-run window checks Python, the Roadie data folder, Resolve Studio, scripting files and the connection to Resolve, plus optional applications.

  1. Open Resolve. In Preferences → System → General, set External scripting using to Local.
  2. In Roadie, fix required items marked red and click Check Again.
  3. Choose Start Using Roadie when the required checks pass. Reopen the check from Help → Setup Check or the account menu.

The free edition of Resolve does not provide the scripting support required by this workflow.

Link to this answer ↗
Ingest

Offload and label all your cards

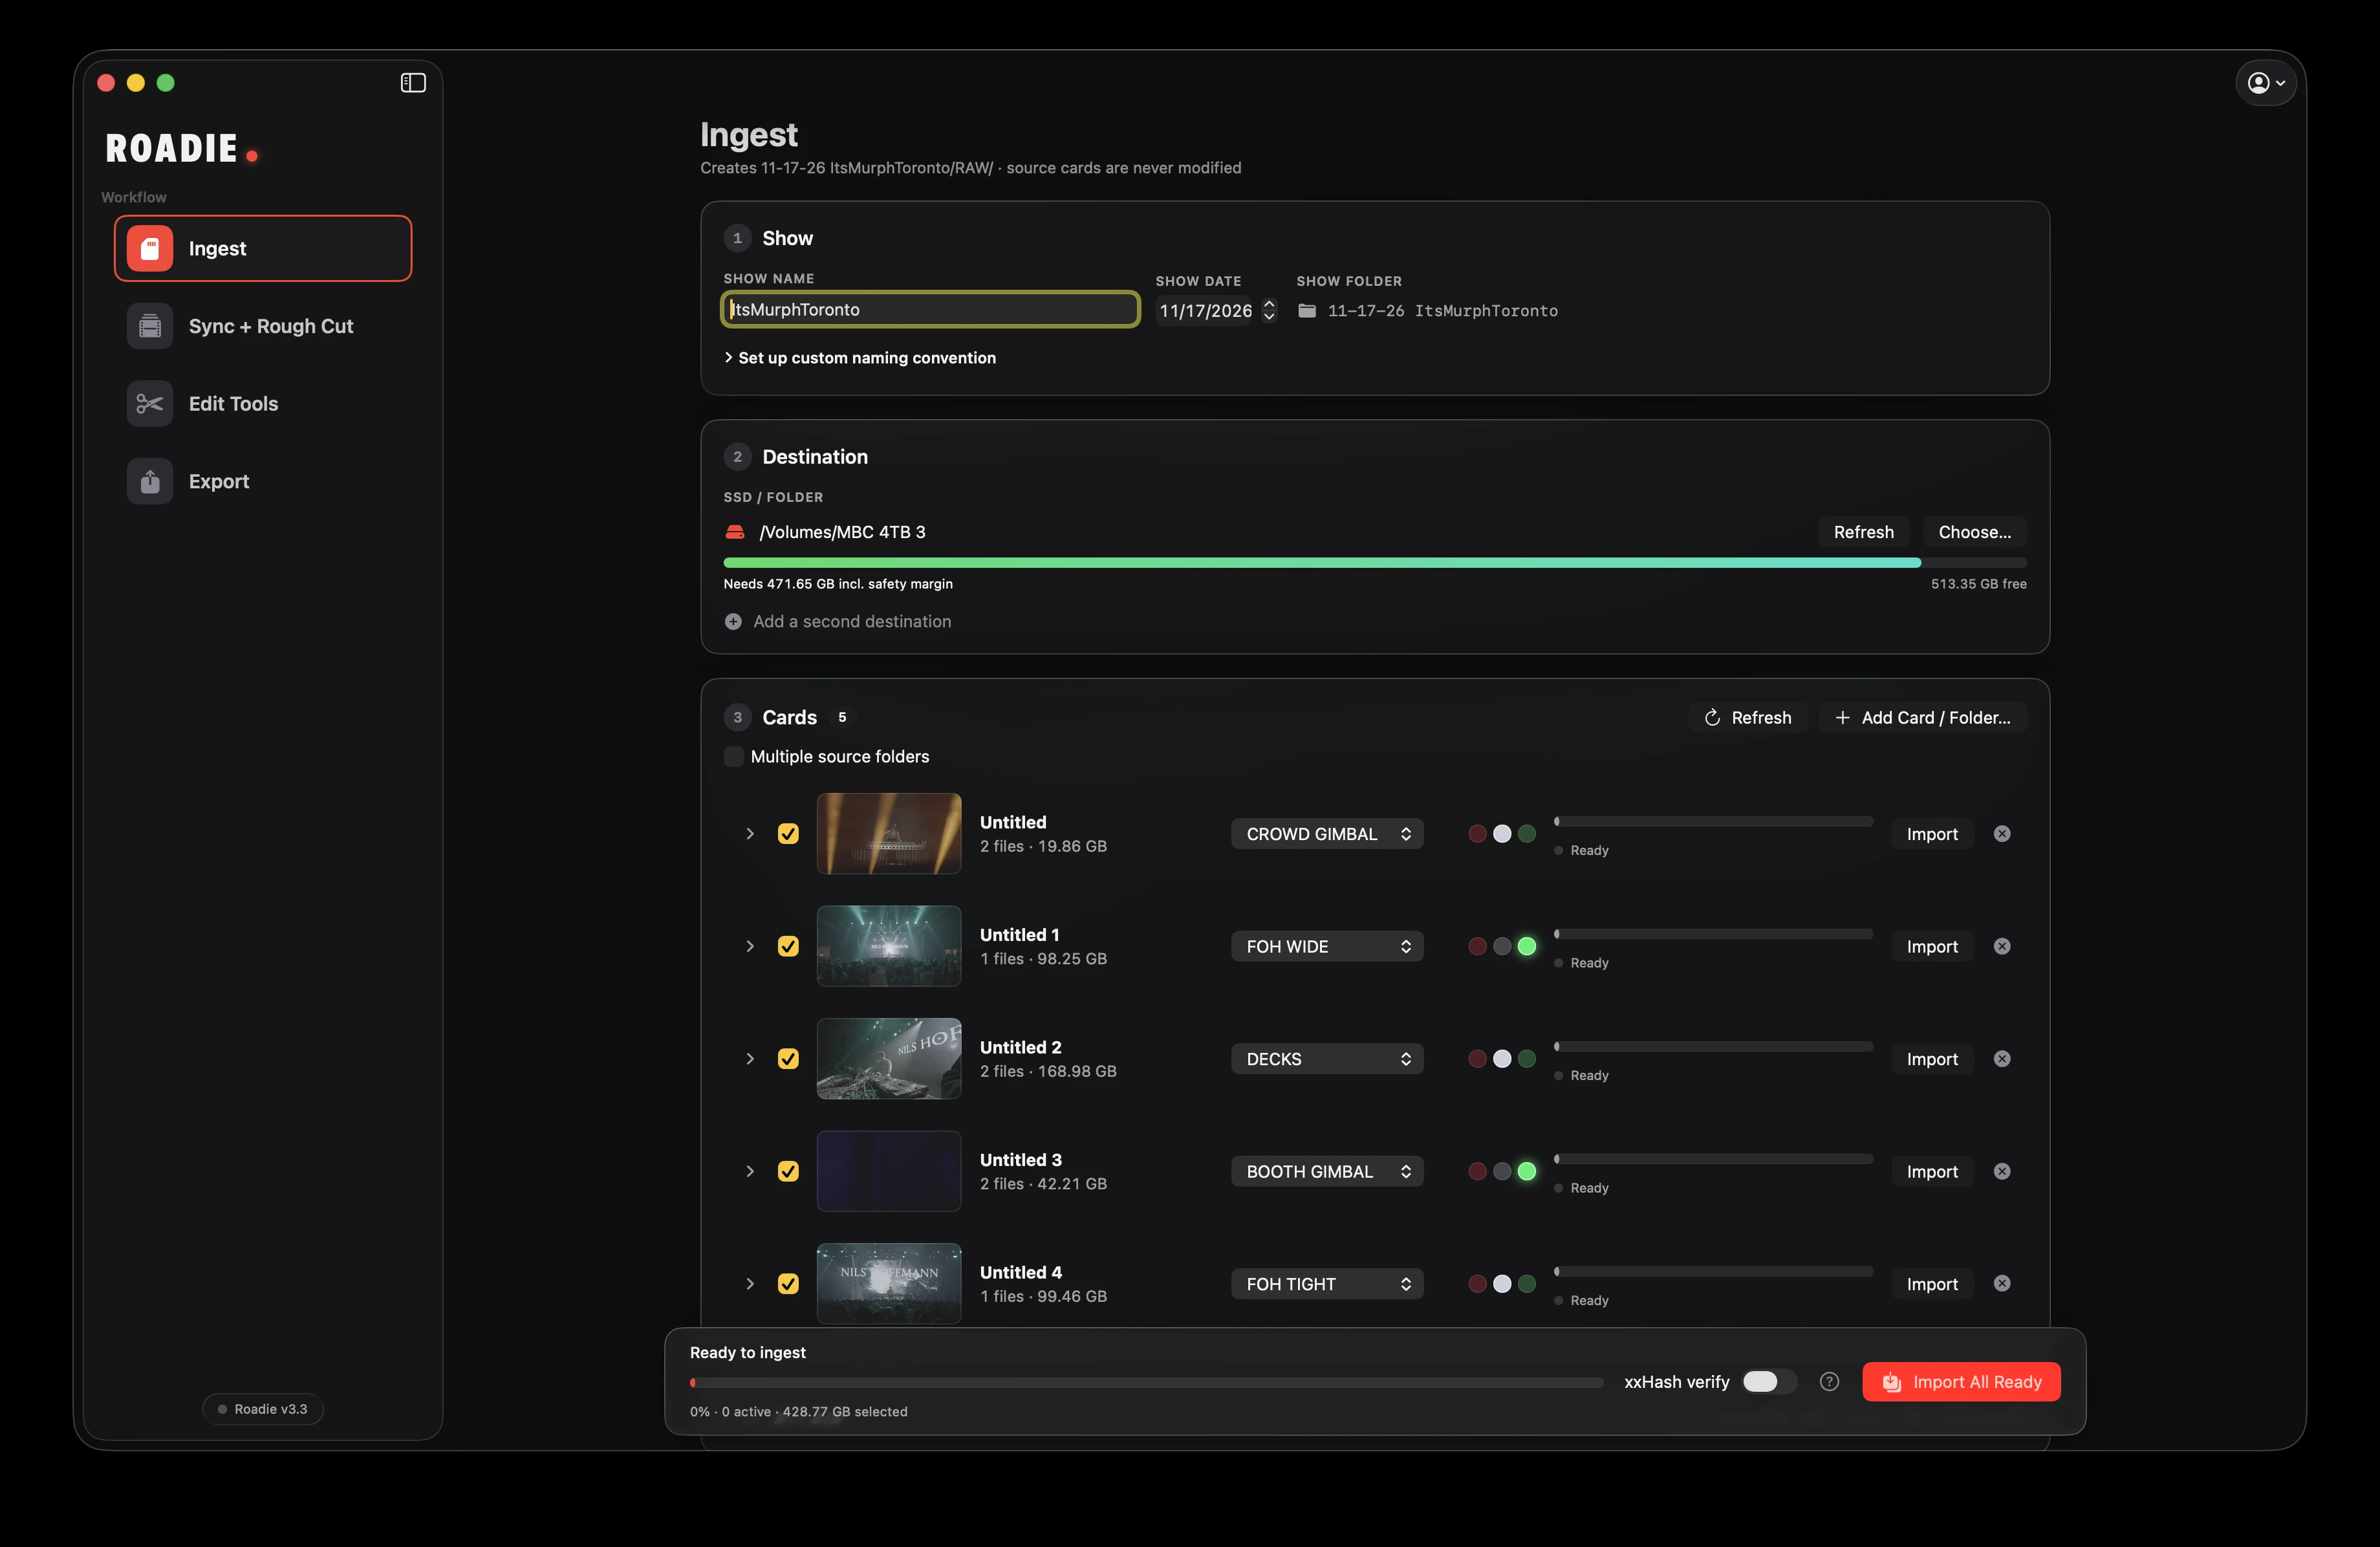
Ingest organizes copies under the show folder in RAW/<ANGLE>/. Source cards and original footage stay untouched.

  1. Enter a Show name and date. Expand Set up custom naming convention to use the {date} and {show} tags.
  2. Choose a destination and check available space. Add a second destination to create two copies in the same pass.
  3. Insert cards or use Add Card / Folder. Assign each card an angle; New Angle adds a name and Edit Angles lets you rename or reorder them.
  4. Enable xxHash verify and click Import All Ready. Import on a card row copies just that card.

After copying, Roadie opens the show on Sync + Rough Cut but does not start the build automatically.

Roadie ingest controls on MacView full-size screenshot ↗Link to this answer ↗
Ingest

Import selected clips or multiple source folders

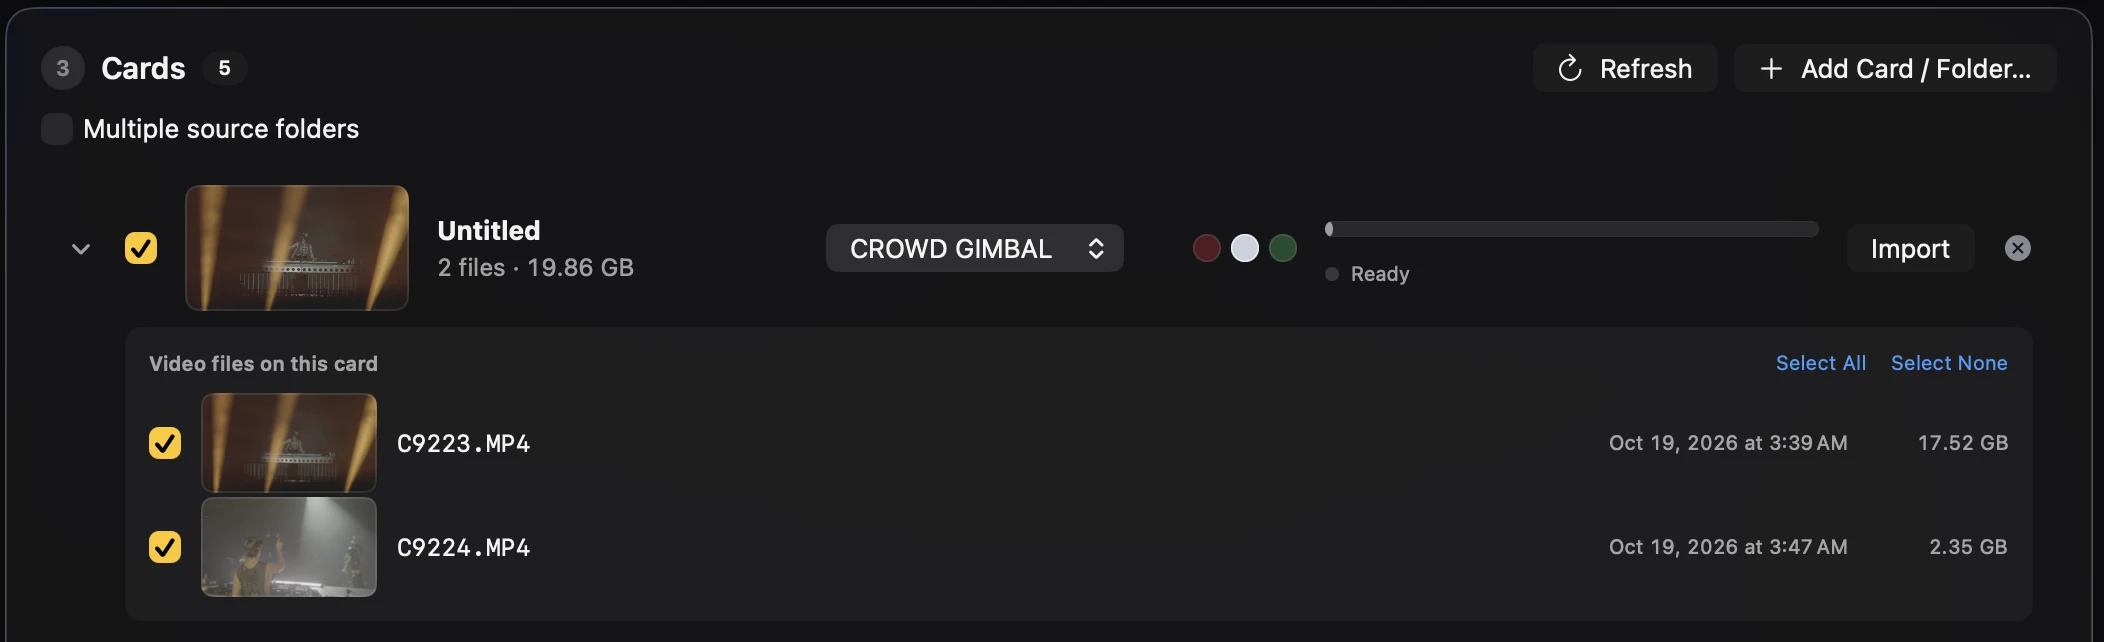
Expand a card with its arrow to choose which files are imported.

  1. Untick unwanted files, or use Select All / Select None. Unticked cards are skipped entirely.
  2. Enable Multiple source folders when combining several folders into one show. Choose each source and use + to add more.
  3. For audio cards, assign Master or Crowd roles and choose a Recorder track when the recorder creates multiple versions. Only the chosen track option is imported.
Roadie cards controls on MacView full-size screenshot ↗Link to this answer ↗
Ingest

Trim clips before importing

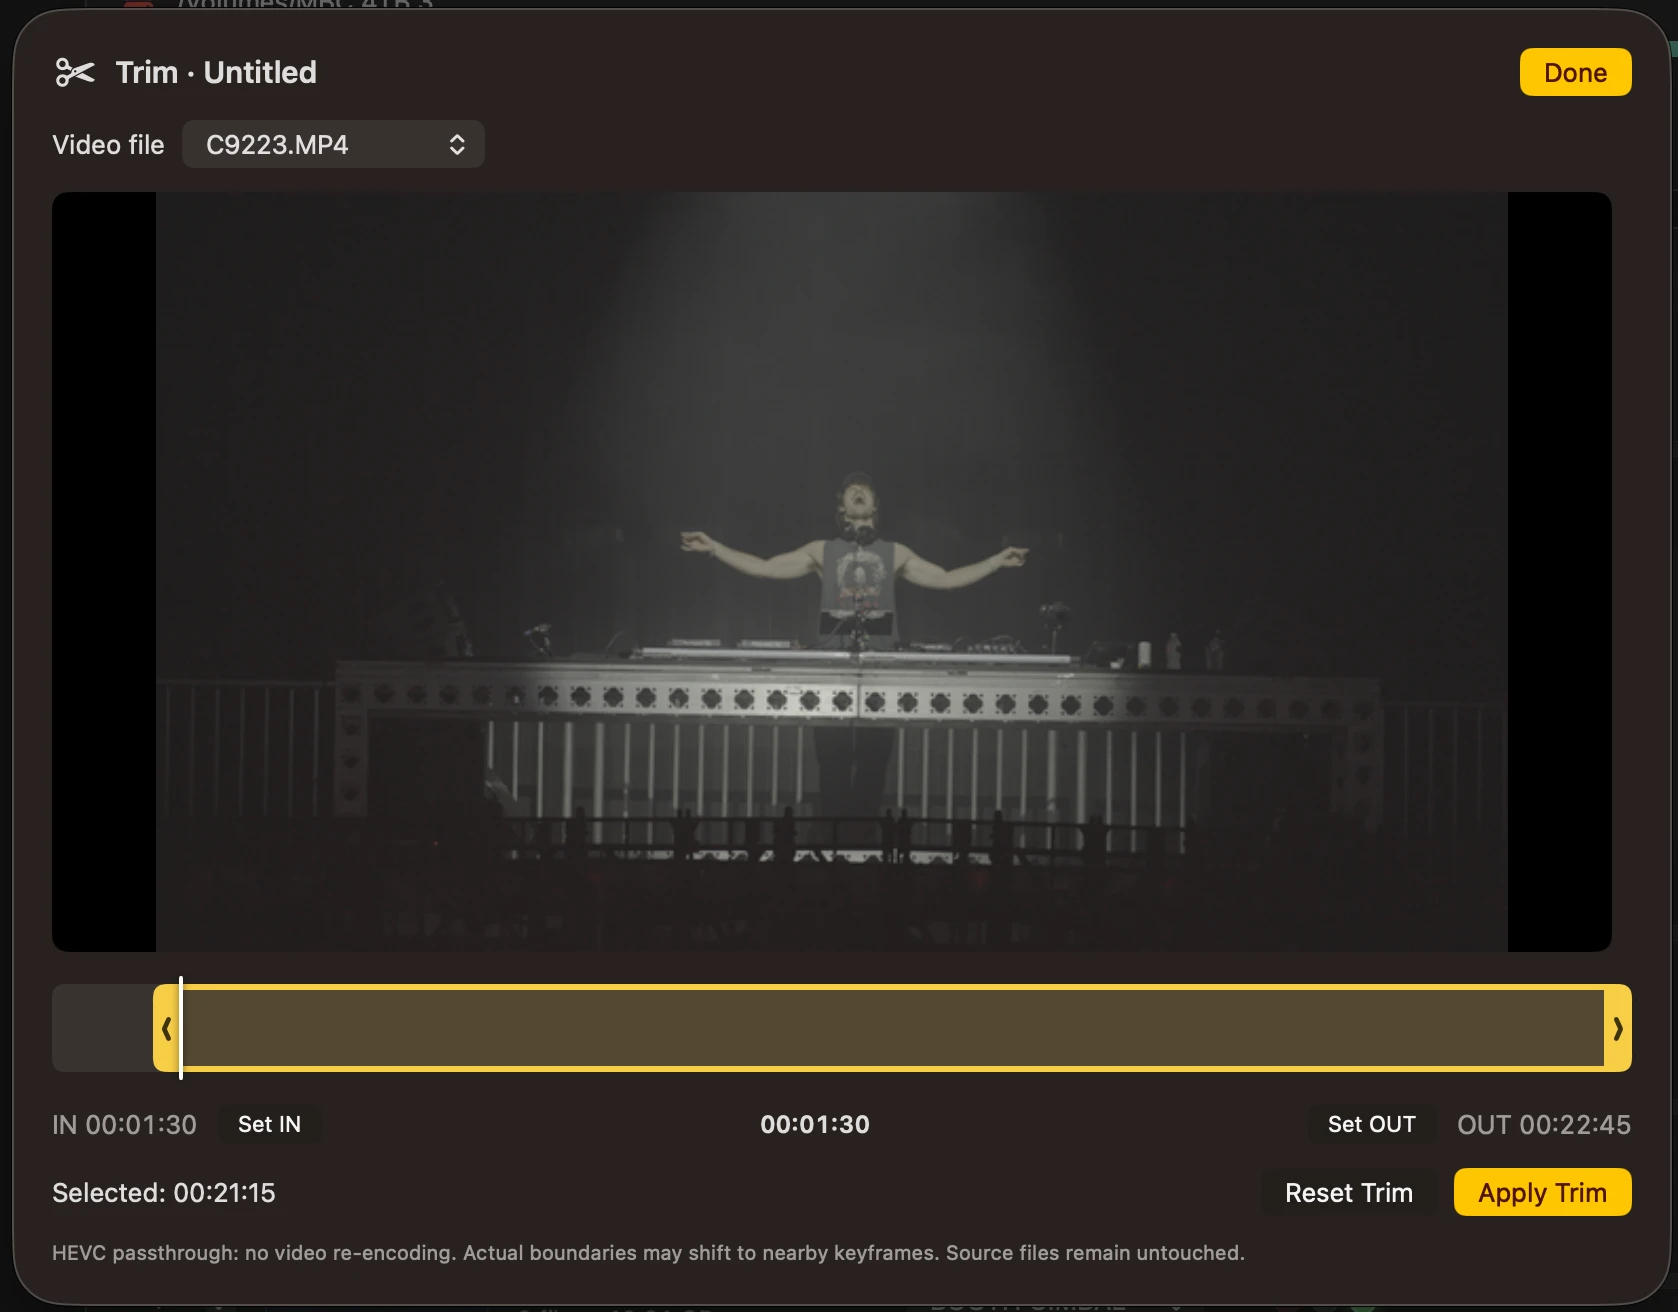
Trimming copies the selected section without video re-encoding and leaves the source file unchanged.

  1. Hover the card thumbnail and click Trim, then choose the clip.
  2. Drag the yellow IN and OUT brackets, or scrub and click Set IN / Set OUT.
  3. Click Apply Trim. Reset Trim restores the full clip. Done with unapplied changes offers Keep Changes, Revert or Cancel.

Actual trim boundaries can shift to nearby keyframes because the media is copied without re-encoding.

Roadie trim controls on MacView full-size screenshot ↗Link to this answer ↗
Ingest

How does xxHash verification work?

After each file is copied, Roadie reads the copy back and compares its XXH64 checksum with the card.

  1. Keep xxHash verify enabled before offloading footage you intend to erase from the cards.
  2. If using a second destination, both copies are verified.
  3. Use Pro DIT manifests if you also want to verify an offload folder later.

The current build uses xxHash (XXH64). Earlier Roadie materials described SHA-256; this guide follows the updated build.

Link to this answer ↗
Ingest

Check card health before copying

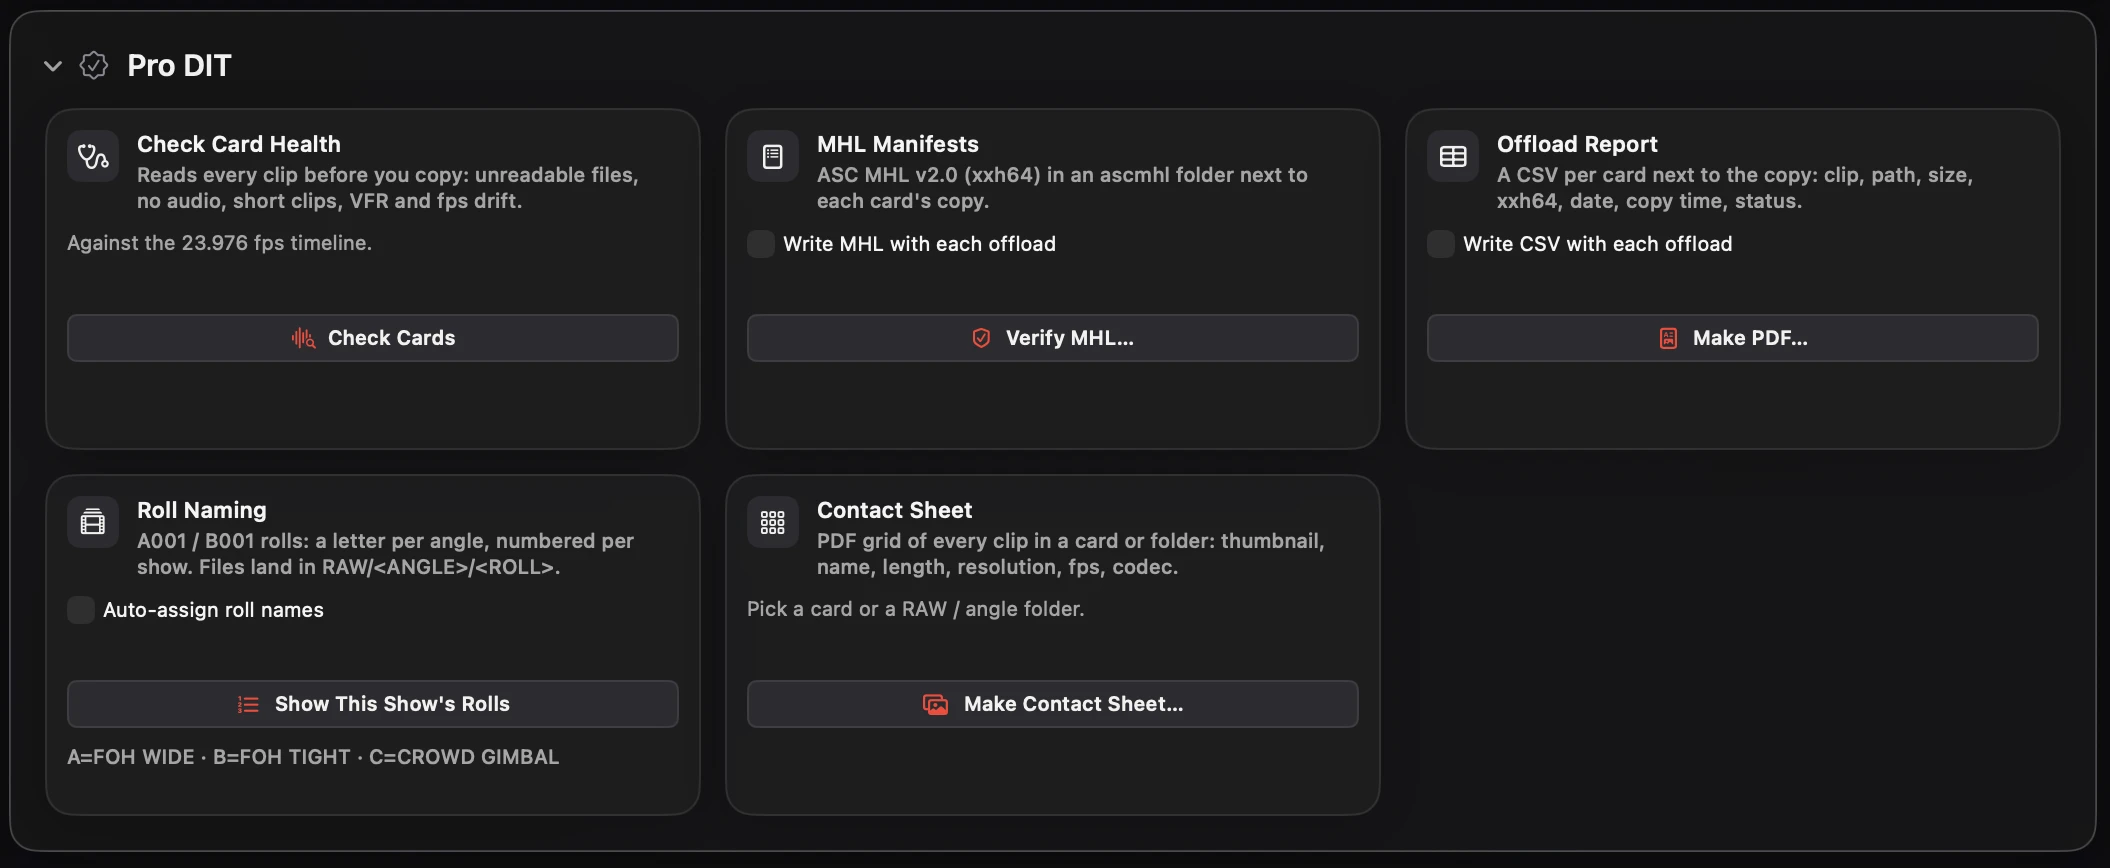
Pro DIT → Check Card Health reads clips for unreadable files, missing audio, very short clips, variable frame rate and frame-rate drift.

  1. Expand Pro DIT on Ingest.
  2. Click Check Cards (Shift-Cmd-K on Mac).
  3. Review All clear or the Issues list before importing.
Roadie pro dit controls on MacView full-size screenshot ↗Link to this answer ↗
Ingest

Create MHL manifests and offload reports

Pro DIT can keep a record of each offload and help you check the files later.

  1. Enable Write MHL with each offload to write ASC MHL v2.0 (xxh64) into an ascmhl folder beside each card copy.
  2. Use Verify MHL to check a folder for missing or changed files.
  3. Enable Write CSV with each offload for clip name, path, size, xxh64, date, copy time and status. Make PDF converts a CSV into a client report.
Roadie pro dit controls on MacView full-size screenshot ↗Link to this answer ↗

Ingest

Assign rolls and make contact sheets

Roll naming adds A001 / B001-style folders; contact sheets provide a visual index of the footage.

  1. In Pro DIT, enable Auto-assign roll names. Each angle gets a letter, with rolls numbered per show under RAW/<ANGLE>/<ROLL>.
  2. Choose Show This Show’s Rolls to review assignments.
  3. Click Make Contact Sheet and choose a card or RAW / angle folder to create a PDF of thumbnails, names, lengths, resolutions, frame rates and codecs.
Roadie pro dit controls on MacView full-size screenshot ↗Link to this answer ↗
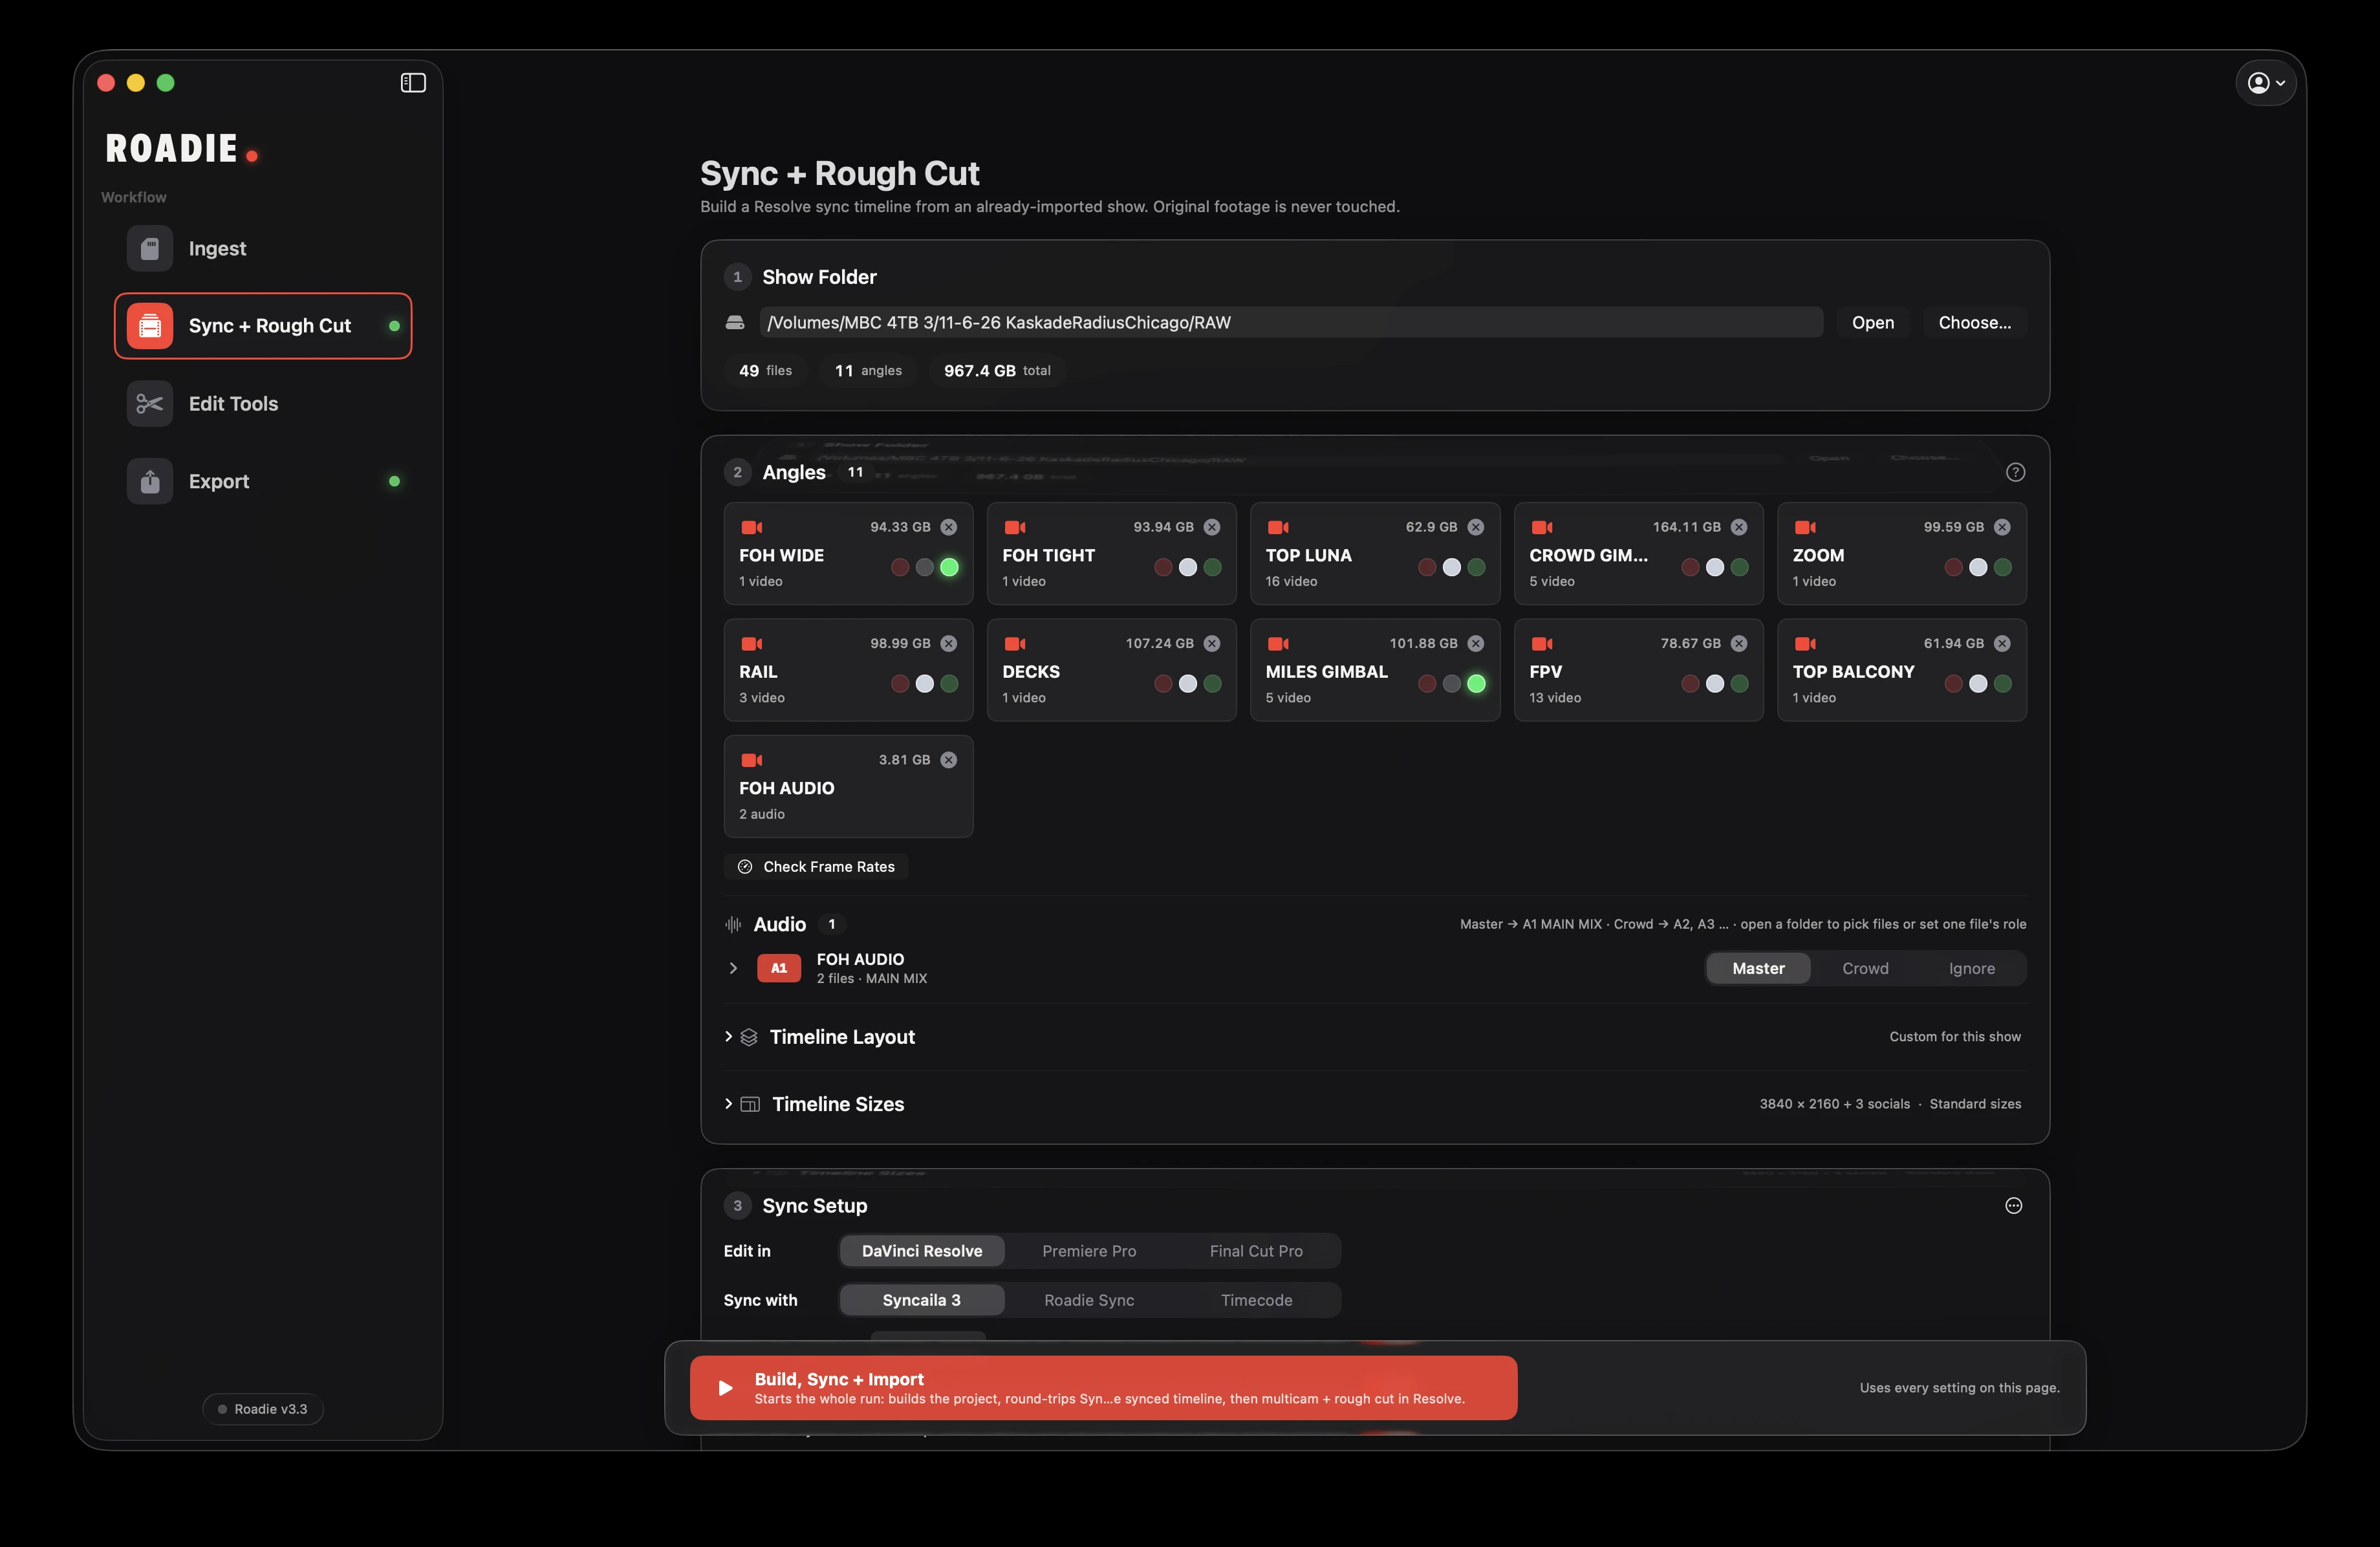
Sync + Rough Cut

Open a show and review its angles

Use an imported show or an existing footage folder. Roadie remembers the last show.

  1. On Sync + Rough Cut, paste a show path and press Return, drag a folder into the field, or click Choose.
  2. Check the file count, angles and total size. Use the x to exclude a folder for this show without deleting it; + brings it back.
  3. Run Check Frame Rates to identify mismatches before building.
Roadie sync controls on MacView full-size screenshot ↗Link to this answer ↗
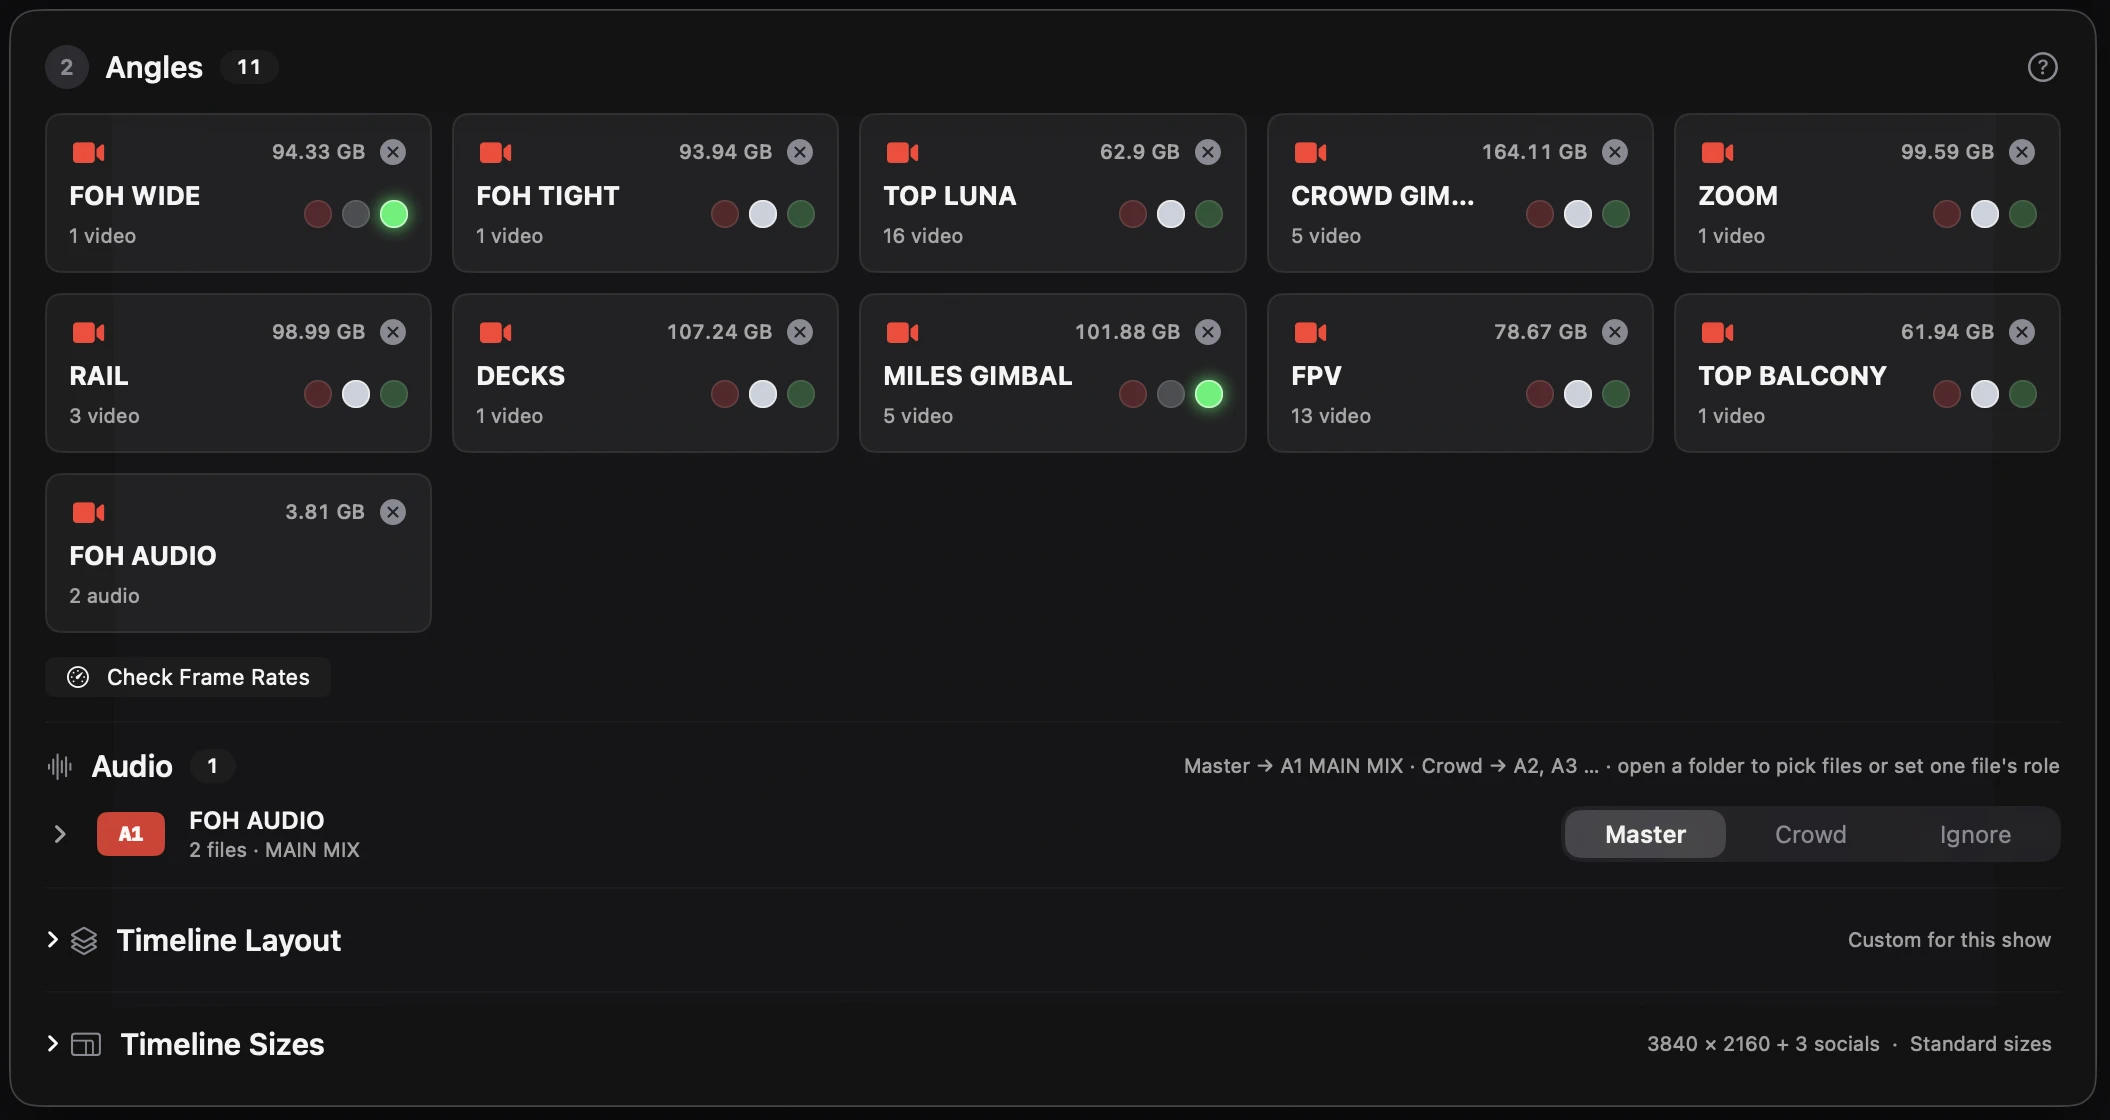
Sync + Rough Cut

What do the red, white and green angle dots mean?

These dots control angle selection in the rough cut; they are not the sidebar’s job-status lights.

  1. Red: the angle is synced and on the timeline, but not used in the rough cut.
  2. White: normal rotation. Green: priority, selected about twice as often.
  3. Priorities are remembered by angle name. Explicit cutting rules override profiles, and profiles override these dots.
Roadie angles controls on MacView full-size screenshot ↗Link to this answer ↗
Sync + Rough Cut

Choose the Master mix and crowd microphones

All cameras sync against your Master audio source.

  1. In Audio, tag exactly one folder or file as Master. It becomes A1 MAIN MIX on the multicam timeline.
  2. Set crowd microphones to Crowd; they follow on A2, A3 and so on. Set unused sources to Ignore.
  3. Expand a folder to listen, untick files, or change a single file’s role.
Roadie audio controls on MacView full-size screenshot ↗Link to this answer ↗
Sync + Rough Cut

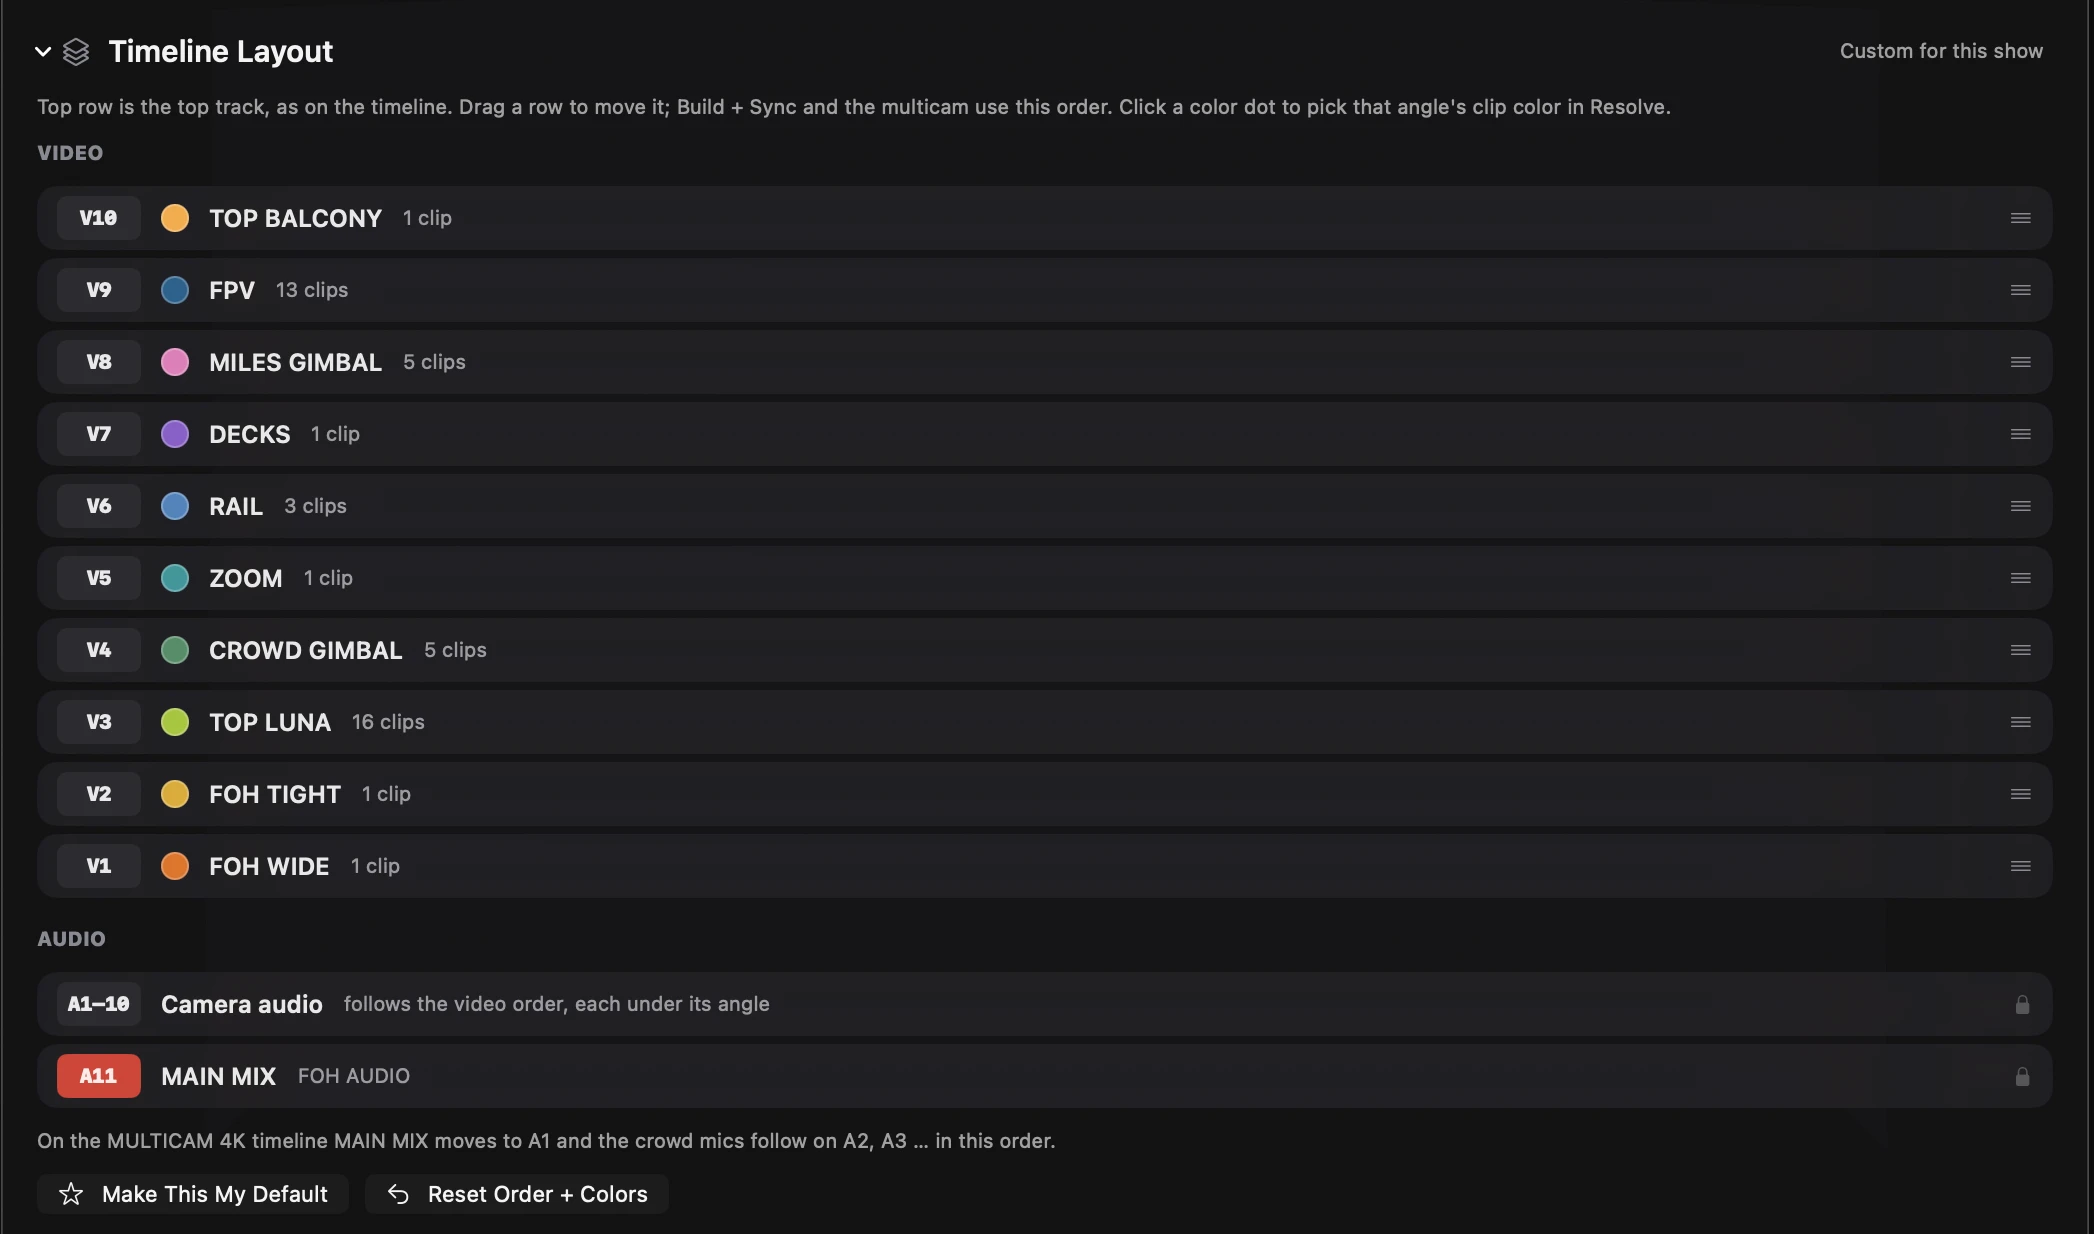
Set timeline track order and angle colors

Timeline Layout controls the video order used by Build + Sync and the multicam.

  1. Expand Timeline Layout. The top row represents the top track.
  2. Drag rows into the order you want. Click an angle color dot to choose a Resolve clip color or Auto (by track).
  3. Use Make This My Default for future shows, or Reset Order + Colors to undo layout changes.
Roadie timeline layout controls on MacView full-size screenshot ↗Link to this answer ↗
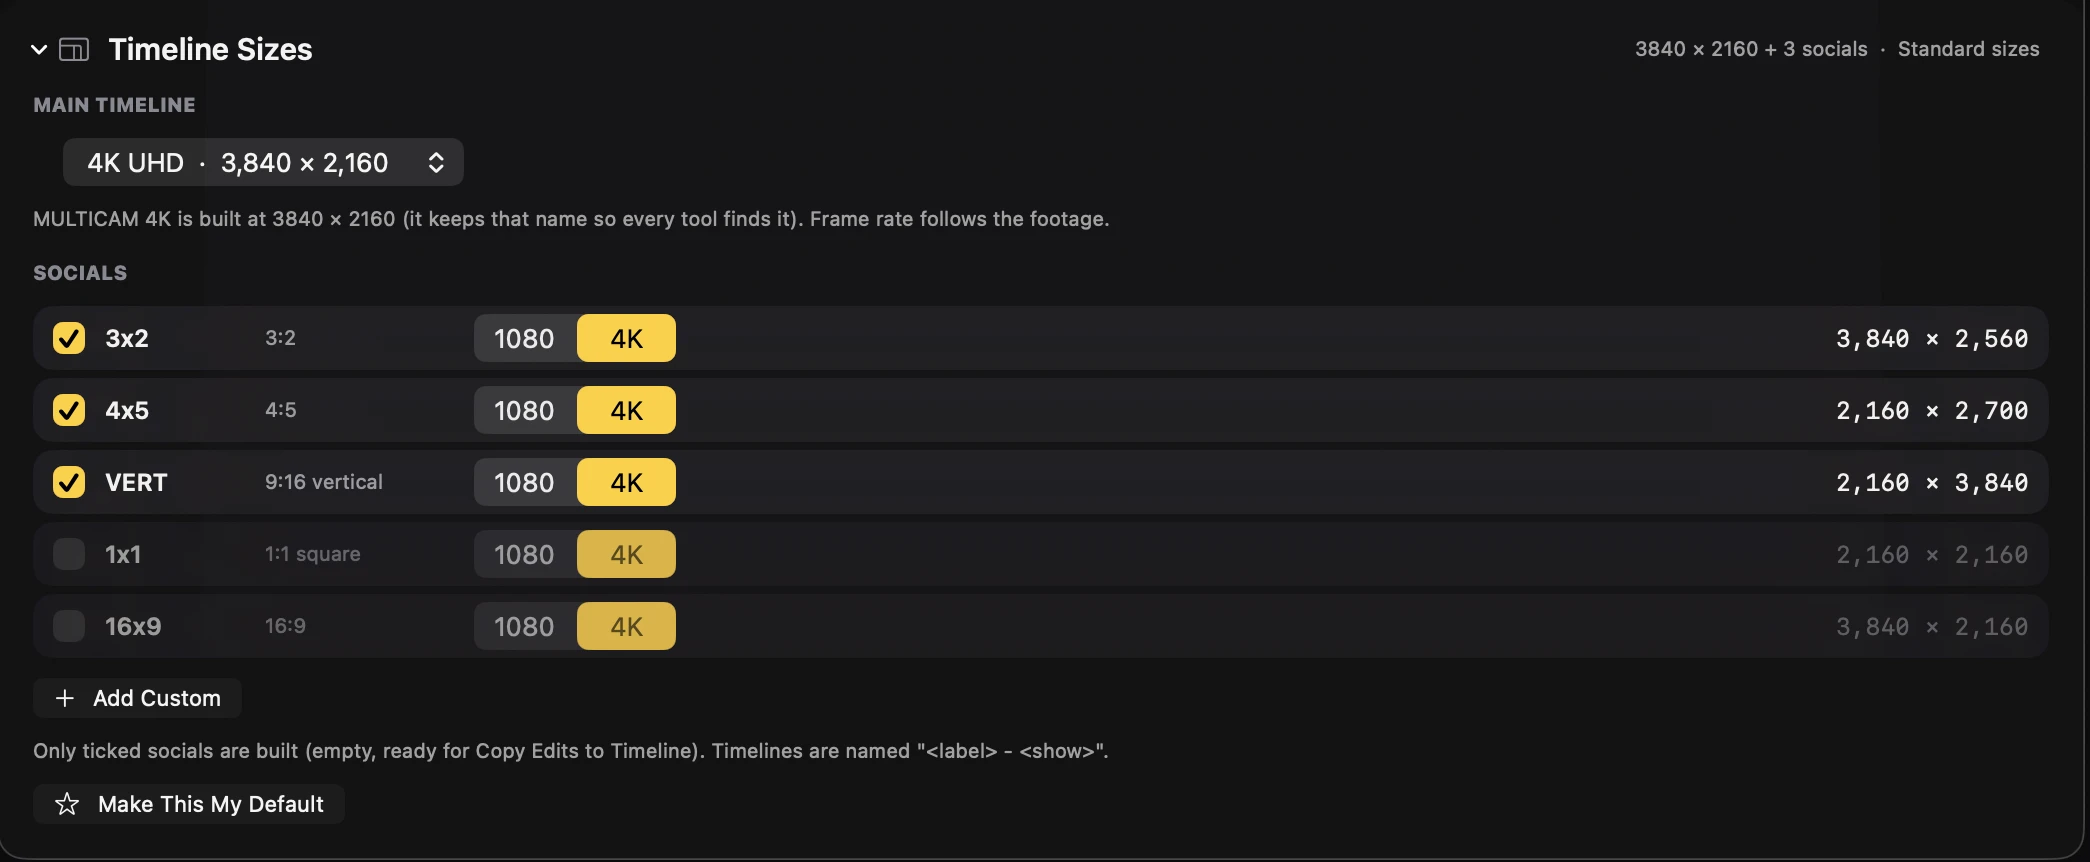
Sync + Rough Cut

Choose main and social timeline sizes

The main timeline keeps the name MULTICAM 4K so tools can find it, even when you choose another size.

  1. Expand Timeline Sizes. Choose 4K UHD, 4K DCI, 1080 HD or Custom for the main timeline.
  2. Tick the social formats you need: 3x2, 4x5, VERT (9:16), 1x1 or 16x9. Choose 1080 or 4K, or Add Custom.
  3. Hover a social name and use the pencil to rename it. Save defaults if needed.
  4. Build creates empty social timelines. Later, use Copy Edits to Timeline to populate them.
Roadie timeline sizes controls on MacView full-size screenshot ↗Link to this answer ↗
Sync + Rough Cut

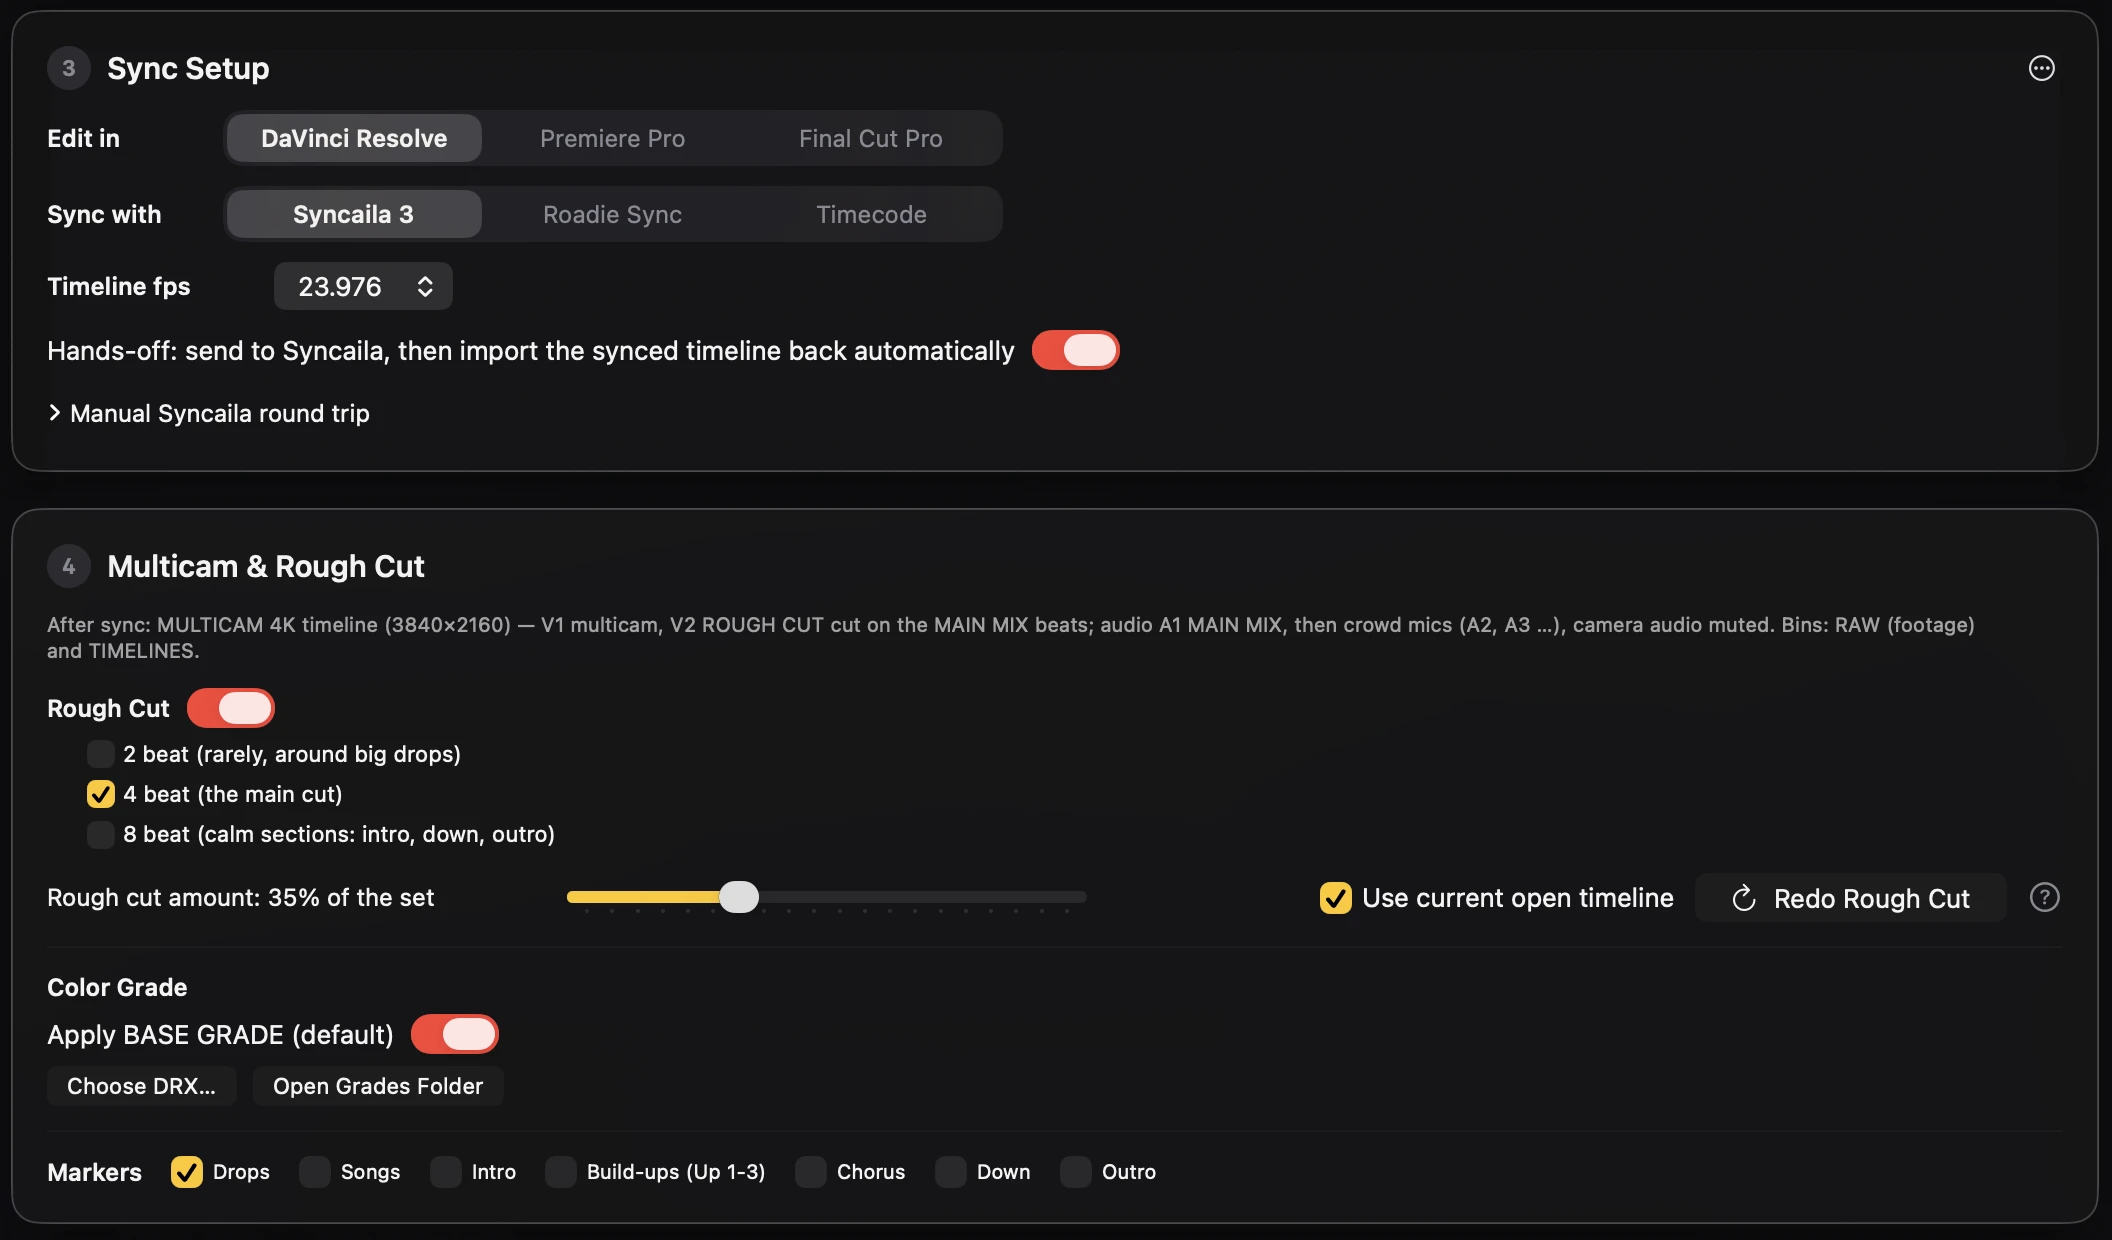
Choose Roadie Sync, Syncaila or Timecode

Choose the editor and sync engine under Sync Setup, then open the editor before building.

  1. Roadie Sync matches camera and crowd-mic audio to the Master mix, including start, end and drift. It needs neither Syncaila nor an AAF.
  2. Syncaila 3 uses an AAF / XML round trip. For Hands-off, enable Sync after import and Export after synchronization in Syncaila’s Automation settings.
  3. Timecode aligns clips by timecode, with optional audio checks. Choose embedded timecode, LTC audio or file time, and set the TC rate.
  4. For Roadie Sync or Timecode, set Min confidence. Lower-scoring clips are left out and listed in Sync Results.
Roadie sync settings controls on MacView full-size screenshot ↗Link to this answer ↗
Sync + Rough Cut

Fine-tune timecode synchronization

Timecode settings let you check alignment against audio and handle cameras that need an offset.

  1. Choose the timecode source and TC rate; for LTC, select the audio channel.
  2. Set Check with audio to off, spot check or every clip, then choose jam tolerance and what to do if audio disagrees.
  3. Configure missing-timecode handling, the FOH window, and per-angle source / offset where needed. Audio correction can adjust offset alone or offset plus drift.
Link to this answer ↗
Sync + Rough Cut

Build a multicam and beat-based rough cut

Build + Sync creates the project and synced timeline, then a multicam and rough cut using the settings on the page.

  1. Enable Rough Cut and choose 2-, 4- and/or 8-beat cuts. With nothing selected, Roadie uses 4-beat cuts.
  2. Set Rough cut amount. Start with a small percentage for a test, then increase it as needed.
  3. Choose markers such as Drops, Songs, Intro, Build-ups, Chorus, Down and Outro.
  4. Open the editor and click the red Build + Sync button (Cmd-B on Mac). Its label changes with the chosen sync engine.

Above 80%, Roadie warns that a full rough cut can make the project laggy. Turning Rough Cut off still builds the multicam, grade, markers and timelines.

Roadie sync settings controls on MacView full-size screenshot ↗Link to this answer ↗
Sync + Rough Cut

Apply a base grade or LUT

The grade controls depend on your editor.

  1. Resolve: enable Apply BASE GRADE, or Choose DRX to use a different grade still.
  2. Premiere Pro beta: enable Add adjustment layer + LUT and Upload LUT. Add Grade Layer Now can add it to a project already built.

Final Cut Pro integration is in development. Its grading workflow is not currently available.

Link to this answer ↗
Sync + Rough Cut

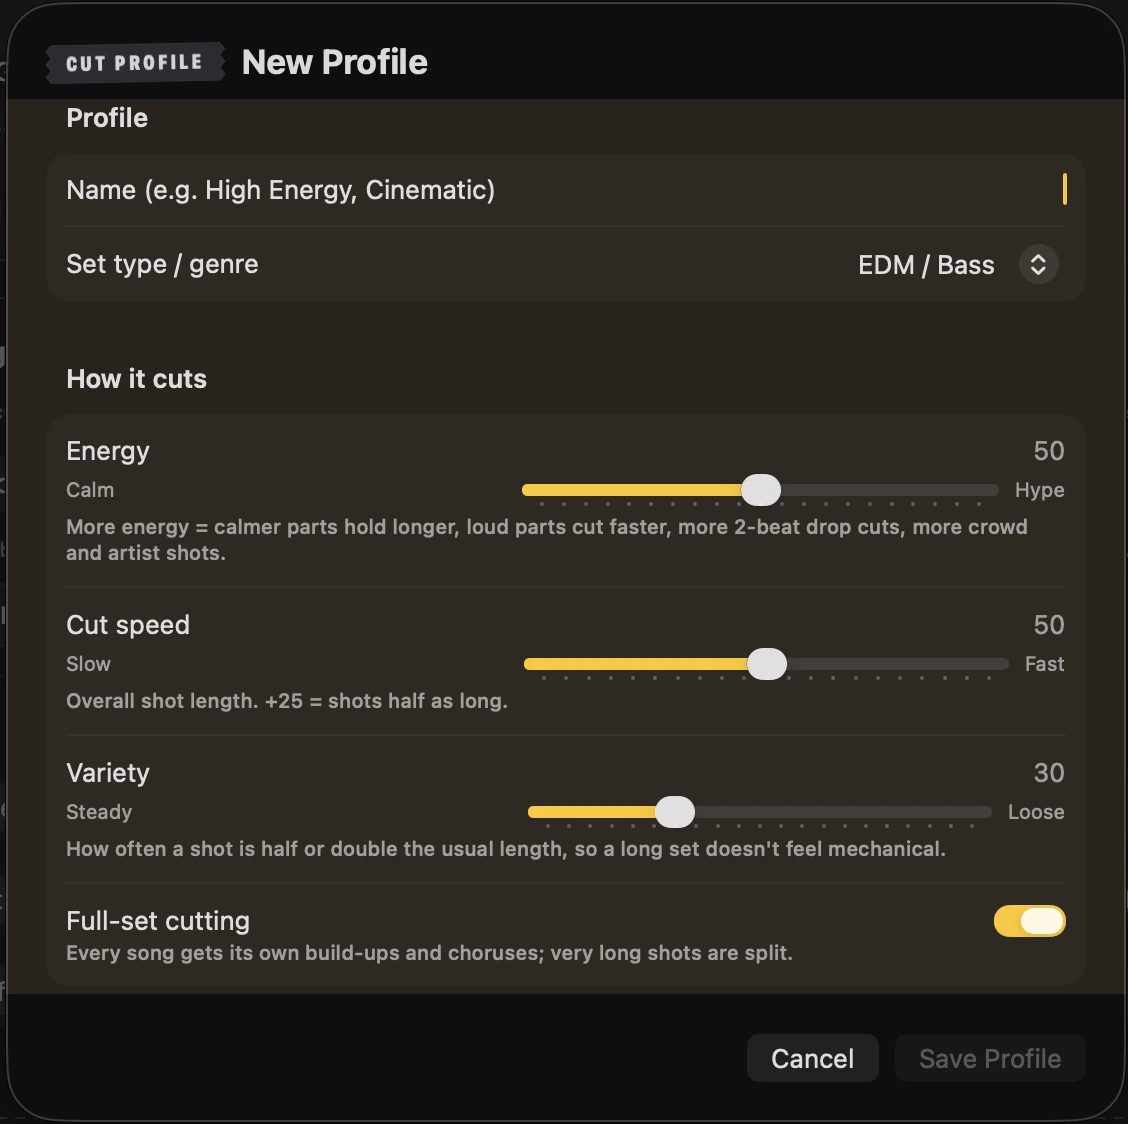
Create a cutting profile

Profiles shape the pacing. Explicit rules override the profile, and the profile overrides the angle priority dots.

  1. Choose an existing profile, or New Profile with Sliders.
  2. Name it and select the set type / genre.
  3. Adjust Energy, Cut speed and Variety. Full-set cutting gives songs their own build-ups and choruses and splits very long shots.
  4. Review the preview text and Save Profile. Use the sliders button to edit a saved profile.
Roadie profile controls on MacView full-size screenshot ↗Link to this answer ↗
Sync + Rough Cut

Train a profile from a finished set

Roadie can learn pacing from a set you already edited.

  1. Choose Train from a Finished Set and select the open Resolve timeline or an exported FCPXML file.
  2. Provide mix audio only if Roadie cannot find it on the timeline.
  3. Choose whether to make a new profile or use Teach Roadie Full Set, then Train.

From a multicam timeline, only timing is learned. Export FCPXML to teach angle choices too.

Link to this answer ↗
Sync + Rough Cut

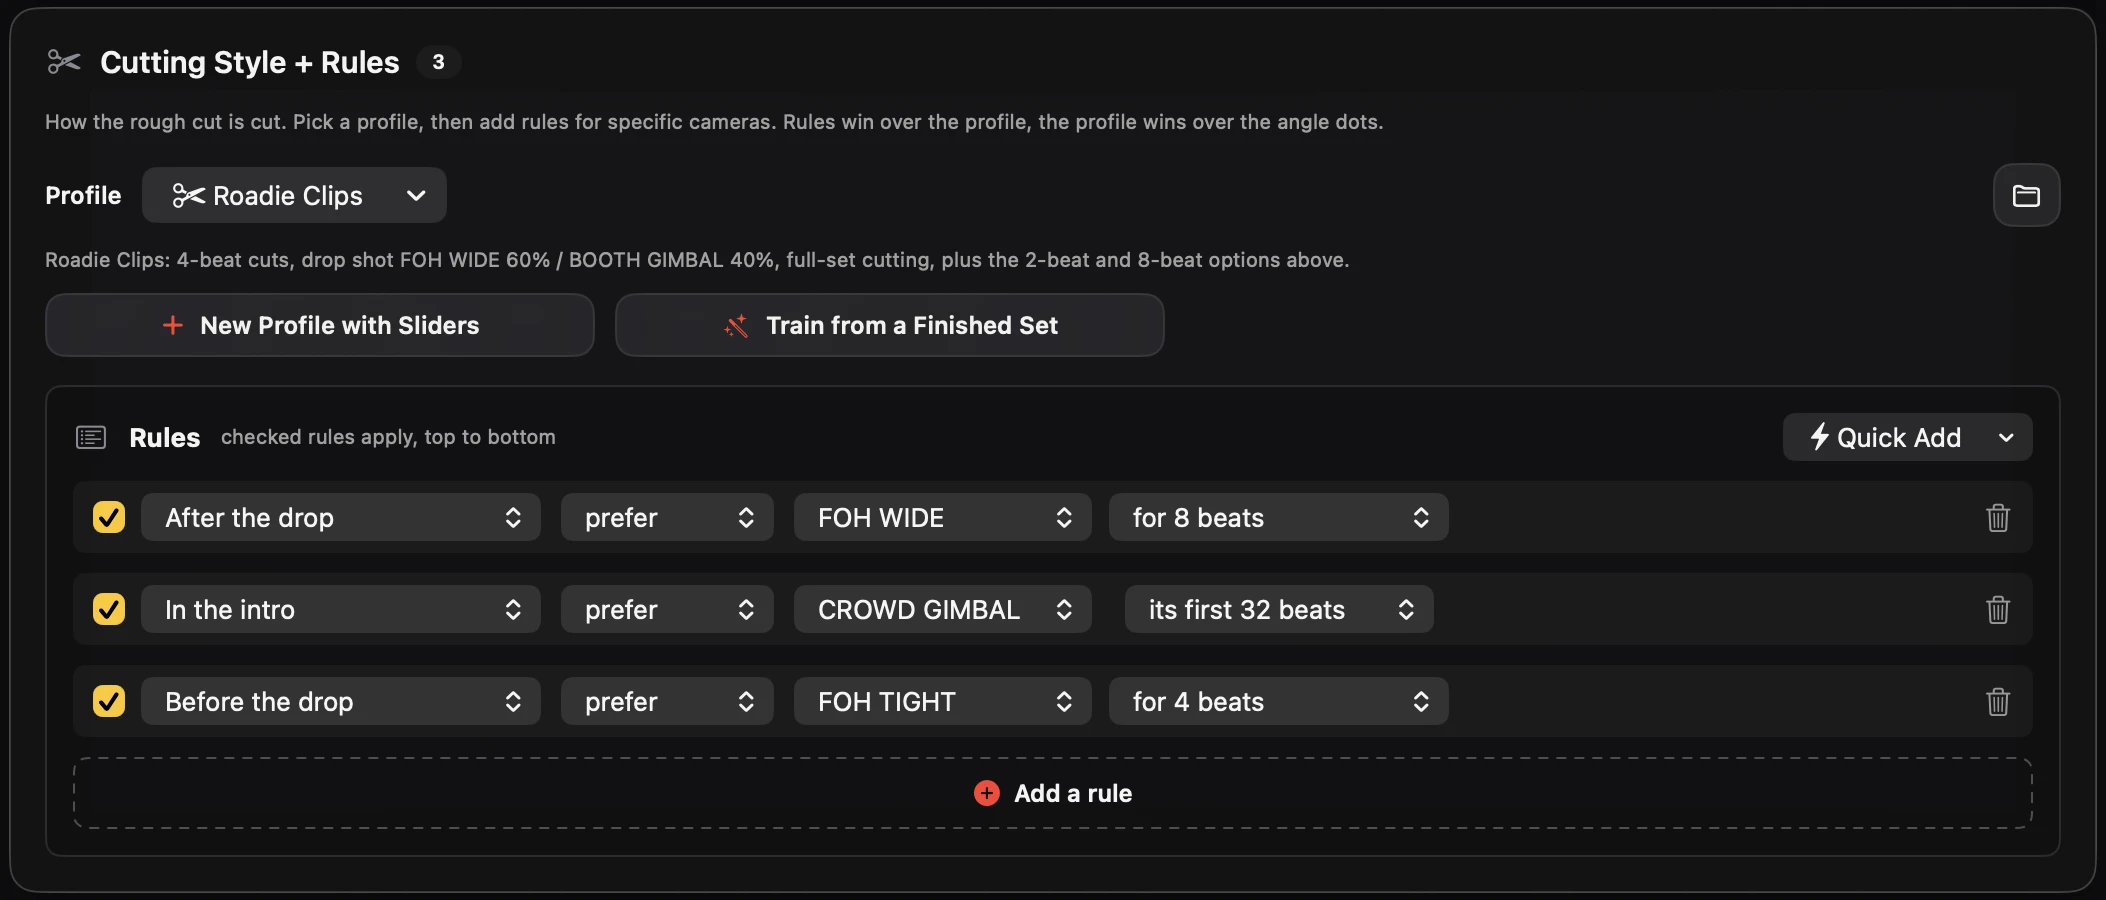
Write rules for specific cameras

Rules read like sentences: when a section happens, only use, prefer or never use an angle for a number of beats.

  1. Choose a profile, then Quick Add for a ready-made camera rule or Add a rule for a blank one.
  2. Choose the section, action, camera and beat length. For example: after the drop, prefer FOH WIDE for 8 beats.
  3. Tick rules to enable them. They apply from top to bottom; the trash button removes a rule.
  4. Run Redo Rough Cut after changing rules if the project is already built.
Roadie cutting rules controls on MacView full-size screenshot ↗Link to this answer ↗
Sync + Rough Cut

Redo a rough cut without syncing again

Redo Rough Cut rebuilds from the newest SYNCED timeline already in the project.

  1. Change the angle dots, profile or rules.
  2. Enable Use current open timeline if you need to keep timing fixes made in Resolve.
  3. Click Redo Rough Cut (Shift-Cmd-M). On MULTICAM 4K, the current-timeline option rebuilds V2 from timing inside the multicam clip.

Sync results are saved in the show’s SYNC folder, so a rebuild does not need to listen again.

Link to this answer ↗
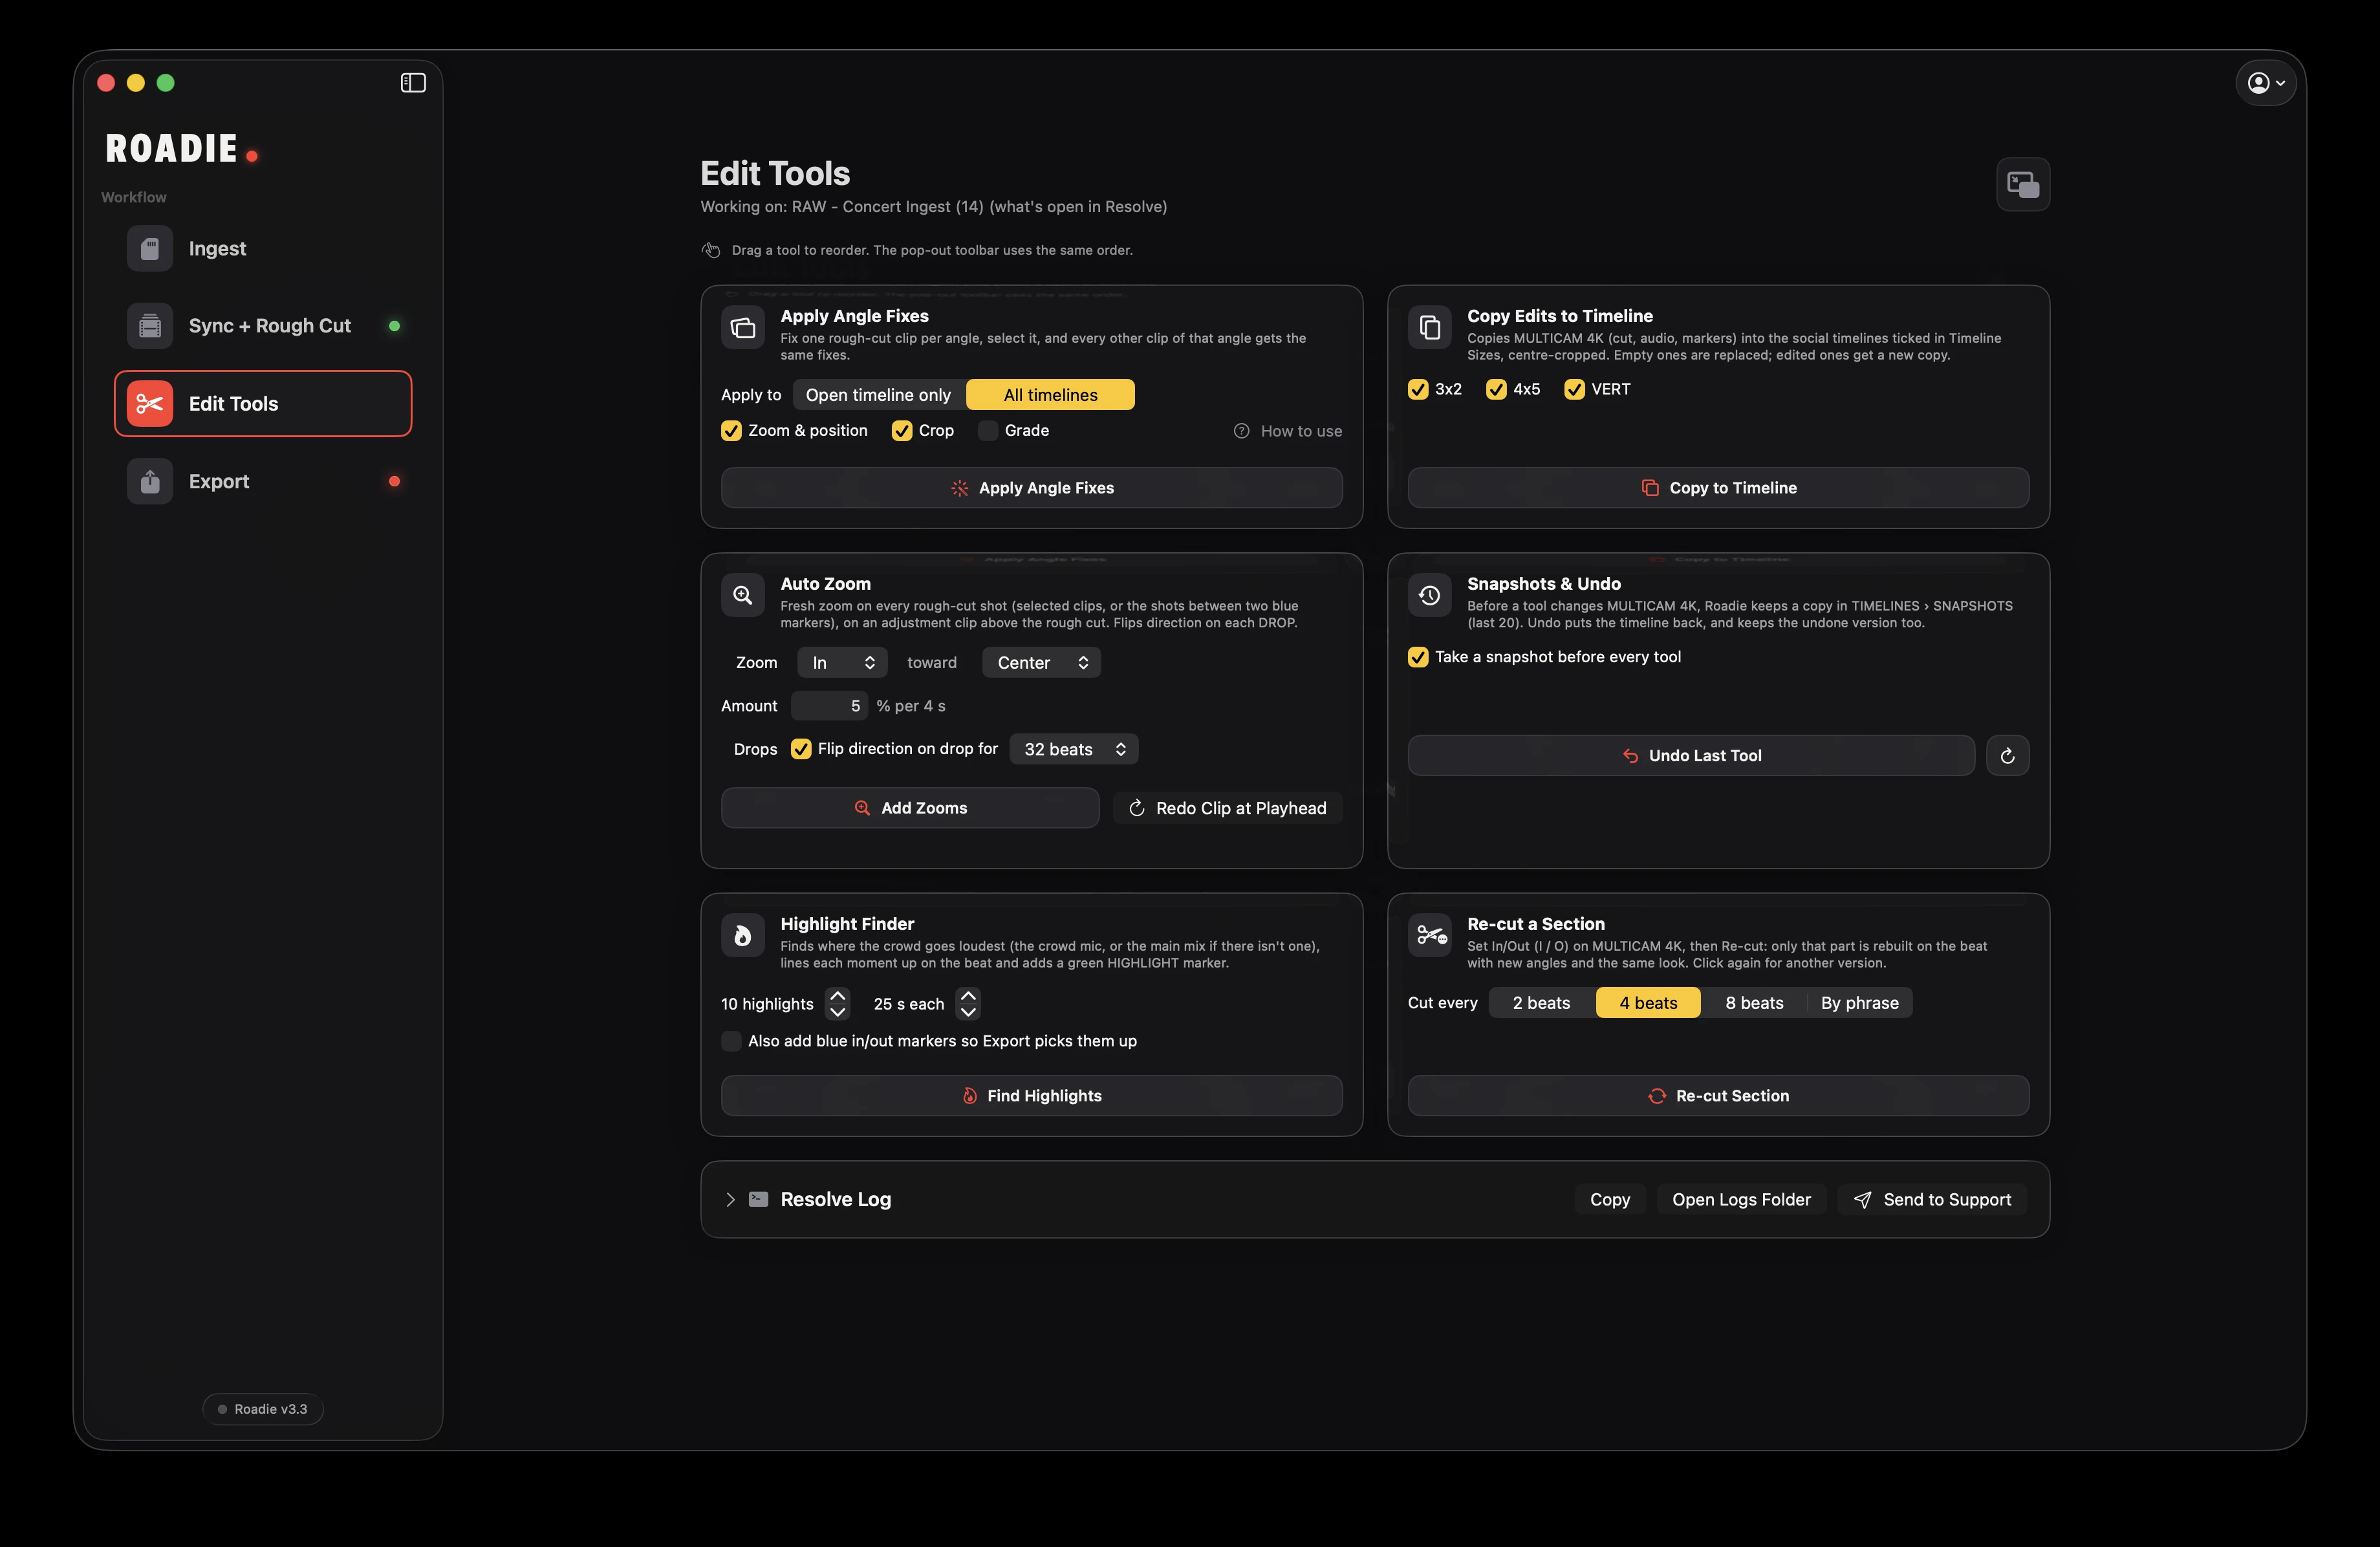
Edit Tools

Apply angle and color-grade fixes across the edit

Edit Tools act on the project and timeline currently open in your editor. Check the project name below the page title first.

  1. On the ROUGH CUT track, fix zoom, position, crop or grade on one clip of an angle.
  2. Select that clip, Cmd-click one per angle to fix several, or flag the reference clips with G.
  3. Tick Zoom & position, Crop and/or Grade. Choose Open timeline only or All timelines, then Apply Angle Fixes.

With All timelines, zoom and crop only propagate to timelines of the same frame size; grade propagates everywhere. Resolve Dynamic Zoom cannot be copied.

Roadie edit tools controls on MacView full-size screenshot ↗Link to this answer ↗
Edit Tools

Add automatic zooms in Resolve

Auto Zoom creates slow zooms on adjustment clips above the rough cut and can reverse direction at drops.

  1. Choose zoom in or out, a target direction, and an Amount. A 4-second shot reaches that amount; a 2-second shot reaches half.
  2. Choose whether to flip direction on a drop for 8, 16, 32 or 64 beats.
  3. Select clips, or place two blue markers around a section, then Add Zooms.
  4. Use Redo Clip at Playhead to redo only the section between the surrounding blue markers.

Auto Zoom is Resolve-only. It is not yet available in Premiere Pro beta. Final Cut Pro integration is in development.

Roadie edit tools controls on MacView full-size screenshot ↗Link to this answer ↗
Edit Tools

Copy your edit into social timelines

Copy Edits to Timeline copies the MULTICAM 4K edit, audio and markers into your selected social formats, center-cropped.

  1. Choose the social formats in Timeline Sizes on Sync + Rough Cut.
  2. In Edit Tools, tick the destinations you want.
  3. Click Copy to Timeline. Empty social timelines are replaced; timelines you already edited receive a new copy.
Roadie edit tools controls on MacView full-size screenshot ↗Link to this answer ↗
Edit Tools

Find highlights and mark clips for export

Highlight Finder finds the loudest crowd moments, or uses the main mix if there is no crowd mic, and aligns them to the beat.

  1. Choose the number of highlights (1–40) and their length (8–90 seconds).
  2. Enable Also add blue in/out markers if you want Export to pick up the results as clips.
  3. Click Find Highlights (Shift-Cmd-H on Mac). Green HIGHLIGHT markers show the moments.
Roadie edit tools controls on MacView full-size screenshot ↗Link to this answer ↗
Edit Tools

Re-cut only one section

Re-cut a Section makes another version of a selected part without rebuilding the entire edit.

  1. On MULTICAM 4K, set In and Out (I / O) around the section.
  2. Choose 2, 4 or 8 beats, or By phrase.
  3. Click Re-cut Section. Click again for another version with new angles and the same look.
Roadie edit tools controls on MacView full-size screenshot ↗Link to this answer ↗
Edit Tools

Restore a snapshot or undo the last tool

With snapshots enabled, Roadie keeps the last 20 copies in TIMELINES → SNAPSHOTS before tools change MULTICAM 4K.

  1. Keep Take a snapshot before every tool enabled.
  2. Use Undo Last Tool (Opt-Cmd-Z on Mac) to restore the previous state. The undone version is kept too.
  3. Refresh the snapshot list and use Restore to return to another saved snapshot.
Roadie edit tools controls on MacView full-size screenshot ↗Link to this answer ↗
Edit Tools

Use the floating tools toolbar

The pop-out toolbar stays above Resolve or Premiere, including in full screen.

  1. Open Show → Pop Out Tools, or press Opt-Cmd-T on Mac.
  2. Click a tile to run its current settings; use its … menu to change options.
  3. Drag tool cards on the main page to reorder them. The toolbar follows the same order. Close the pop-out to use the main-page cards again.
Link to this answer ↗
Export

Render and deliver your marked clips

Export can work on any open project, including one Roadie did not build.

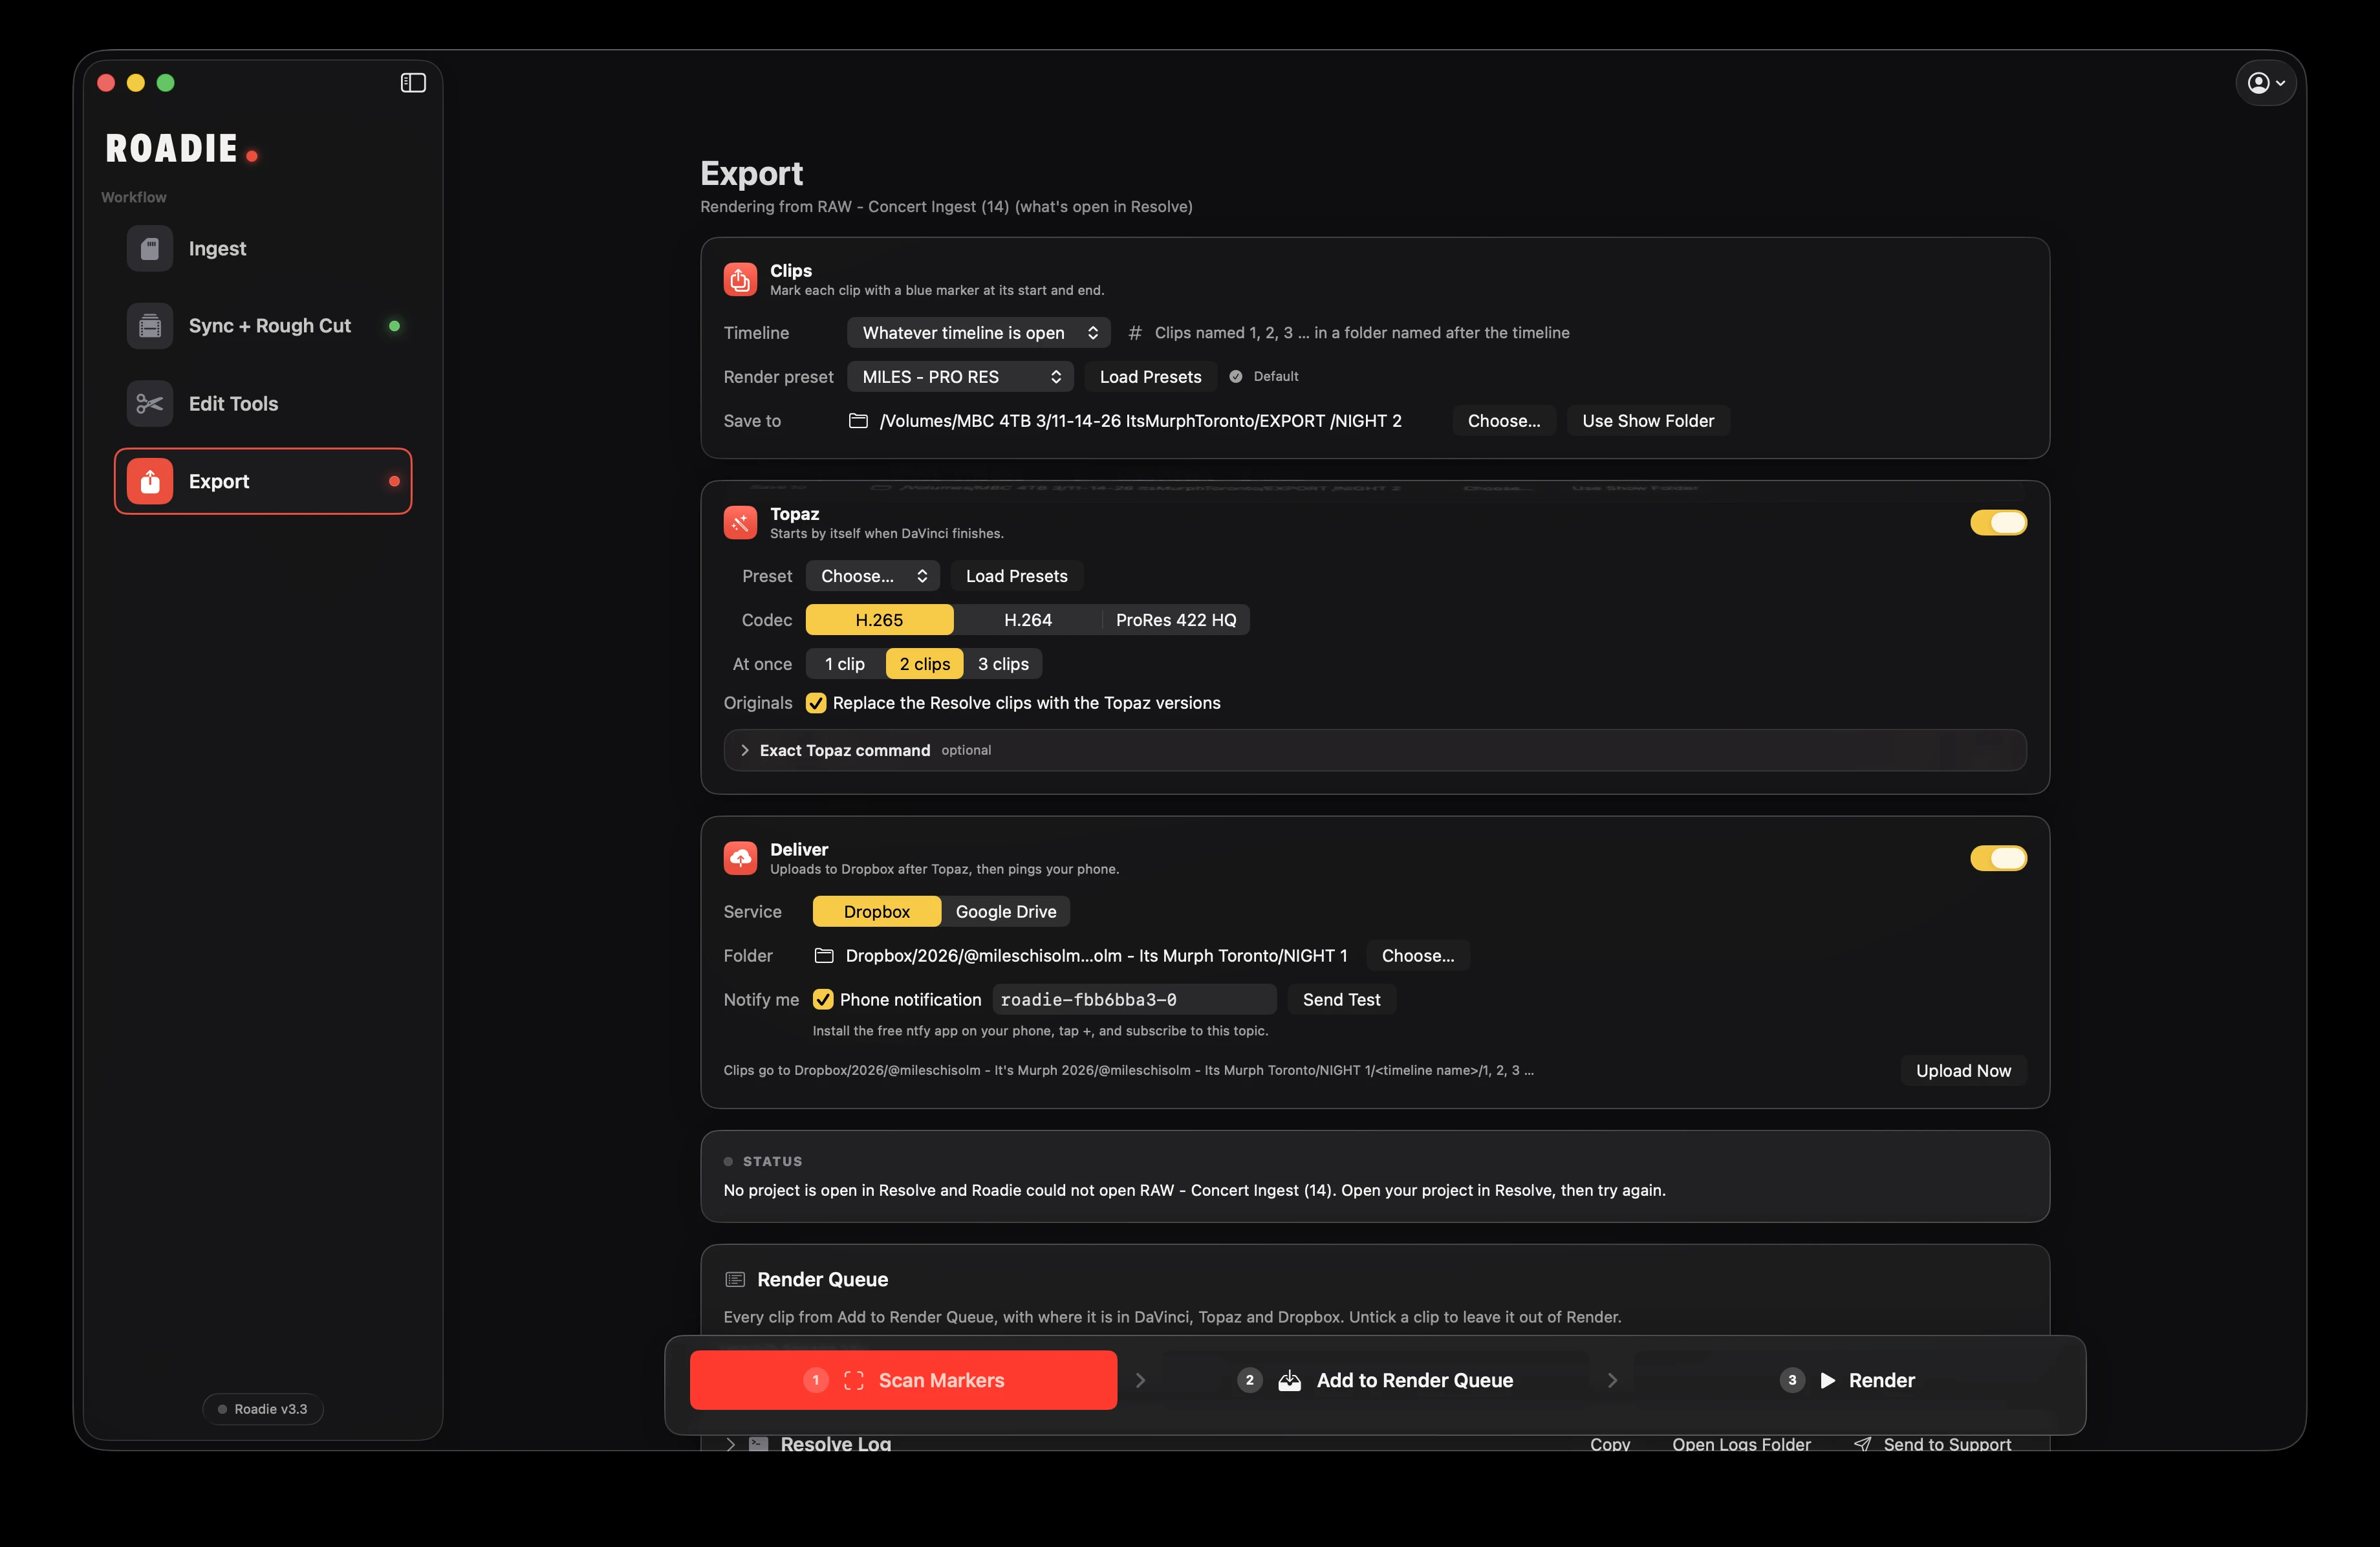
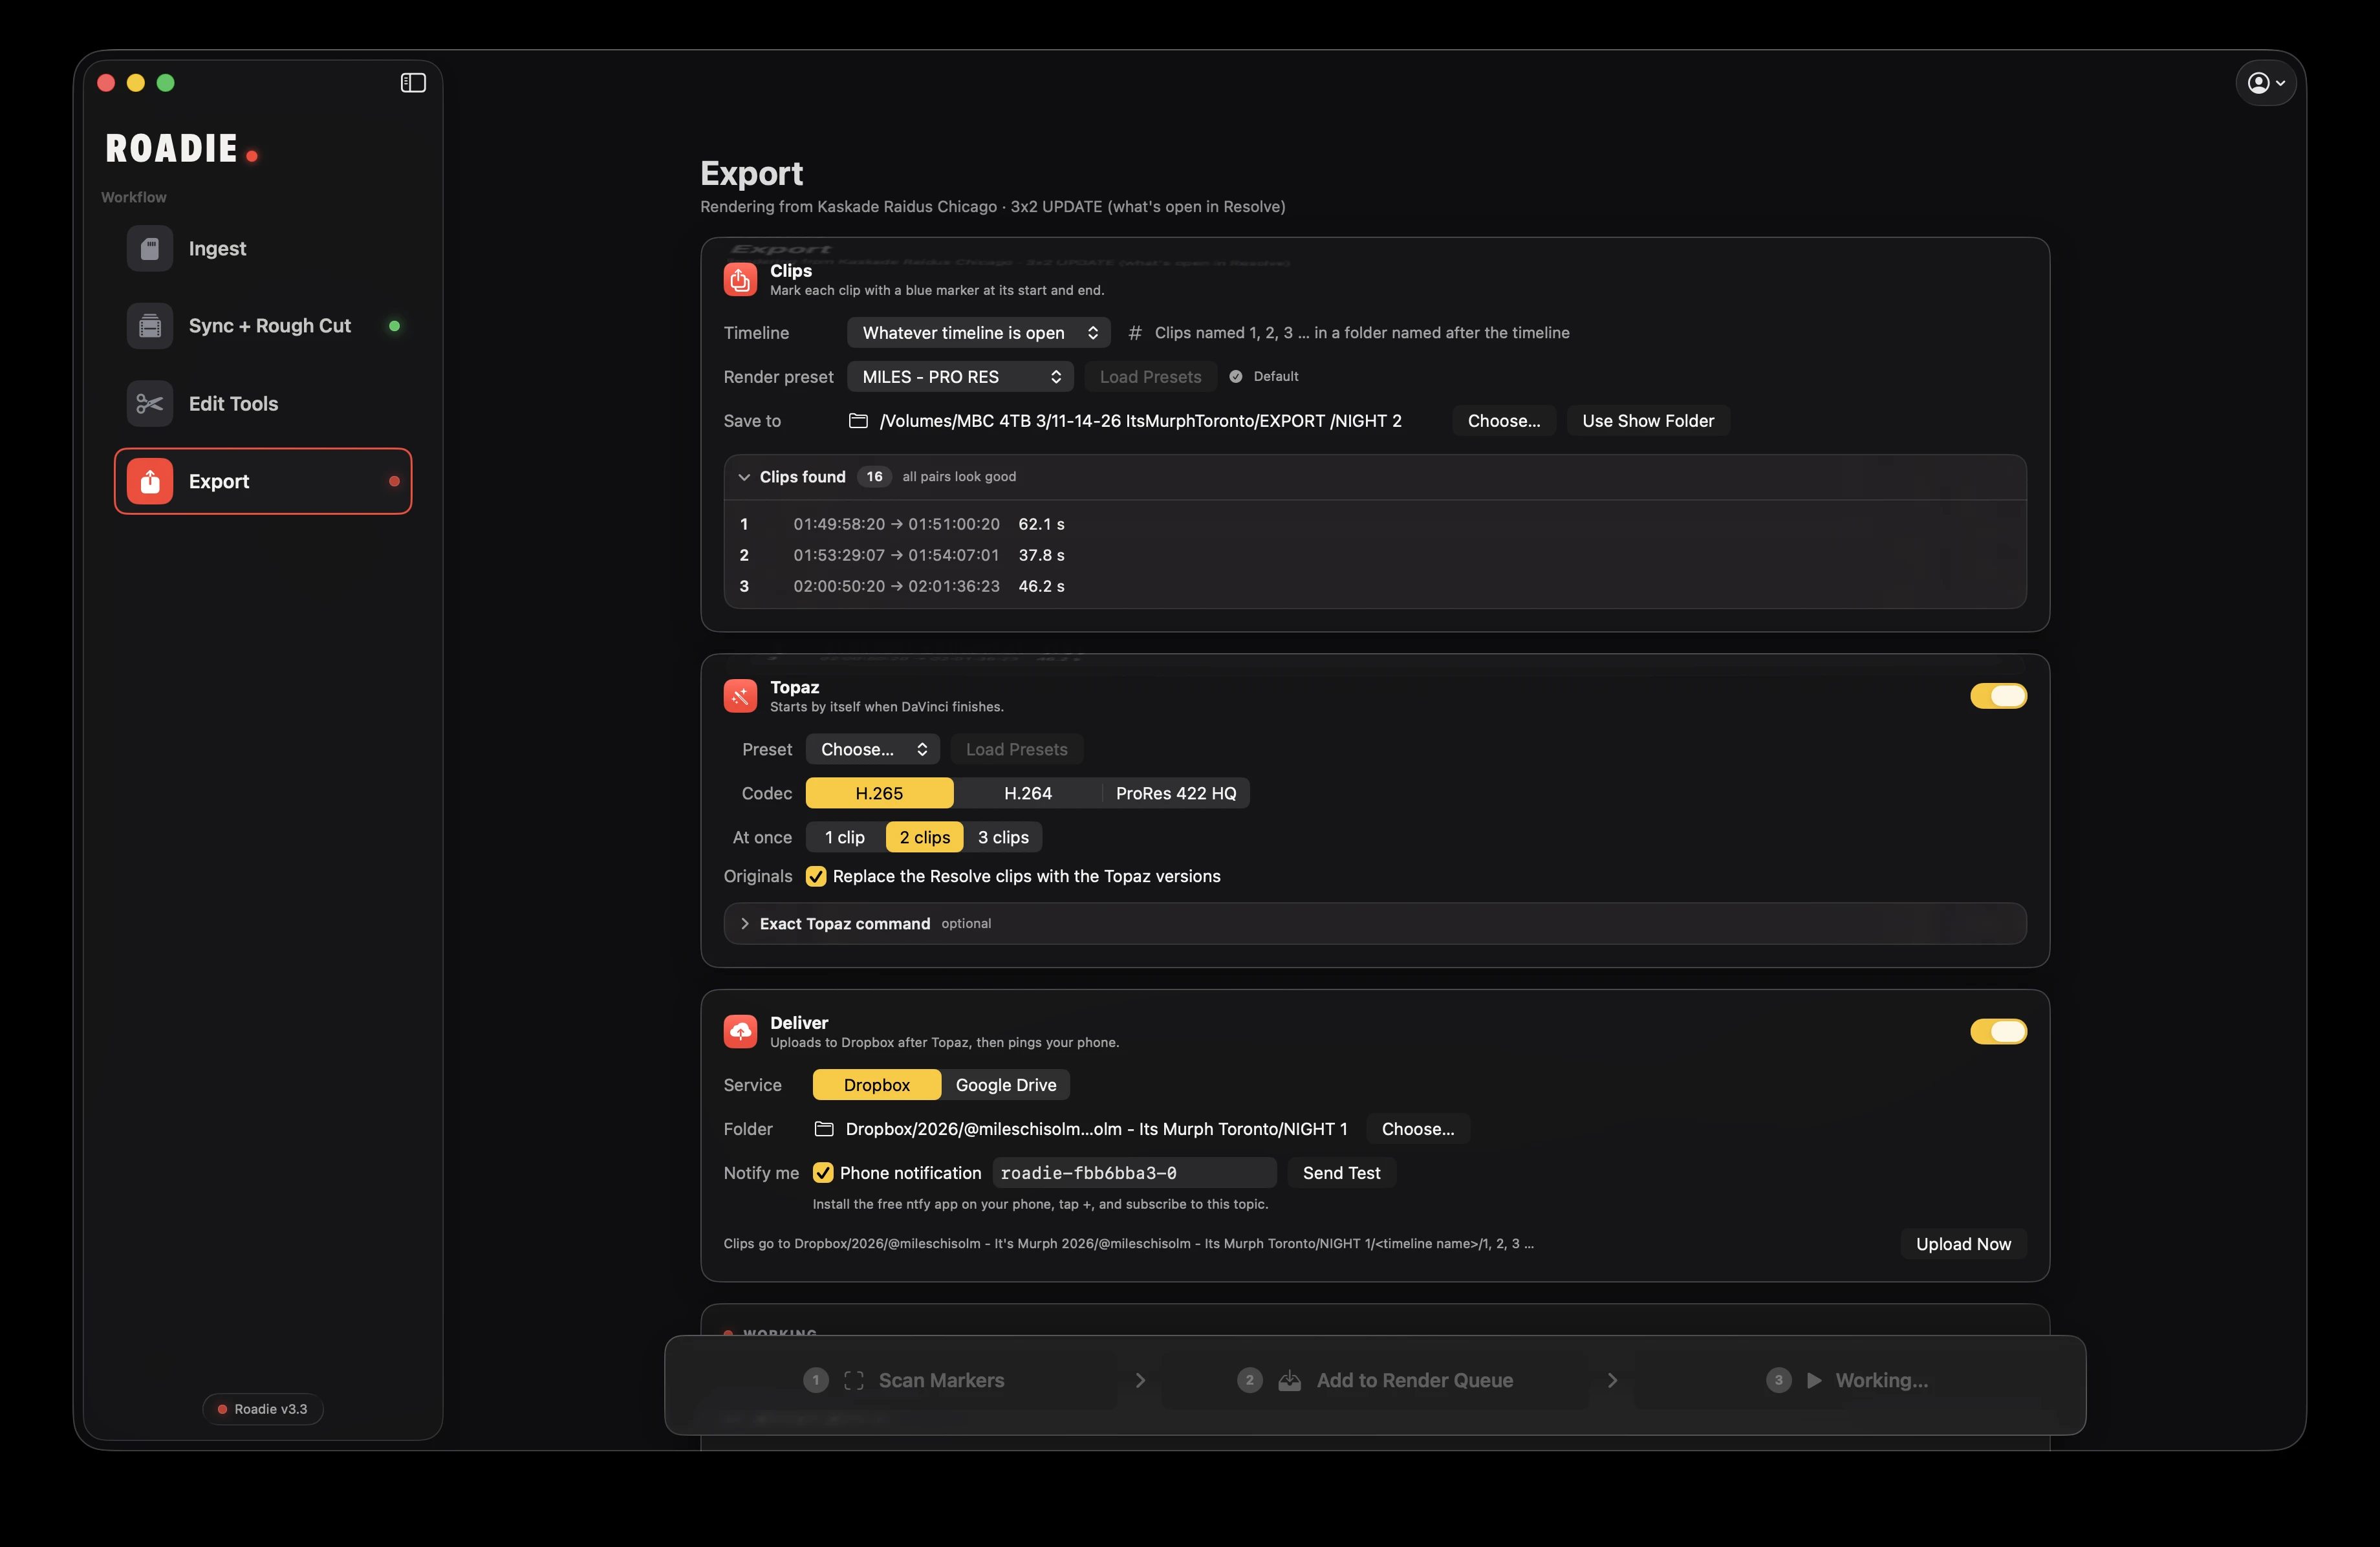
  1. In the editor, place a blue marker at the beginning and end of every clip. Choose a timeline, render preset and output folder in Roadie.
  2. Click Scan Markers and review Clips found.
  3. Click Add to Render Queue to create one Deliver job per clip.
  4. Click Render. If enabled, Topaz follows rendering, then Deliver uploads the results.

Markers pair in order: 1+2, 3+4, and so on. Pairs less than 3 seconds apart are treated as stray markers; an unmatched final marker is flagged.

Roadie export controls on MacView full-size screenshot ↗Link to this answer ↗
Export

Run Topaz after rendering

Enable Topaz to start enhancement automatically after DaVinci finishes.

  1. Load Presets and choose your Topaz preset. Save as Default if needed.
  2. Choose H.265, H.264 or ProRes 422 HQ and 1, 2 or 3 simultaneous clips.
  3. Enable Replace the Resolve clips with the Topaz versions if you only want to keep enhanced files, renamed back to 1, 2, 3.
  4. For an exact preset match, optionally paste the FFmpeg command from Topaz into Exact Topaz command.

Topaz Video AI is a separate, optional application.

Roadie export running controls on MacView full-size screenshot ↗Link to this answer ↗
Export

Upload to Dropbox or Google Drive

Deliver runs after Topaz, or immediately after rendering when Topaz is off.

  1. Install the chosen desktop sync app and sign in.
  2. Enable Deliver, select Dropbox or Google Drive, then choose a folder inside that service.
  3. Clips are placed in <folder>/<timeline name>/ as files numbered 1, 2, 3 and so on.
  4. Use Upload Now to run delivery manually after changing a folder.
Roadie export running controls on MacView full-size screenshot ↗Link to this answer ↗
Export

Get a phone notification when delivery finishes

Roadie uses an ntfy topic for the optional phone ping.

  1. Install ntfy on your phone and subscribe to your chosen topic.
  2. In Deliver, enable Phone notification and enter the same topic.
  3. Use Send Test to confirm the connection before running a show.
Link to this answer ↗
Export

Track clips through the render queue

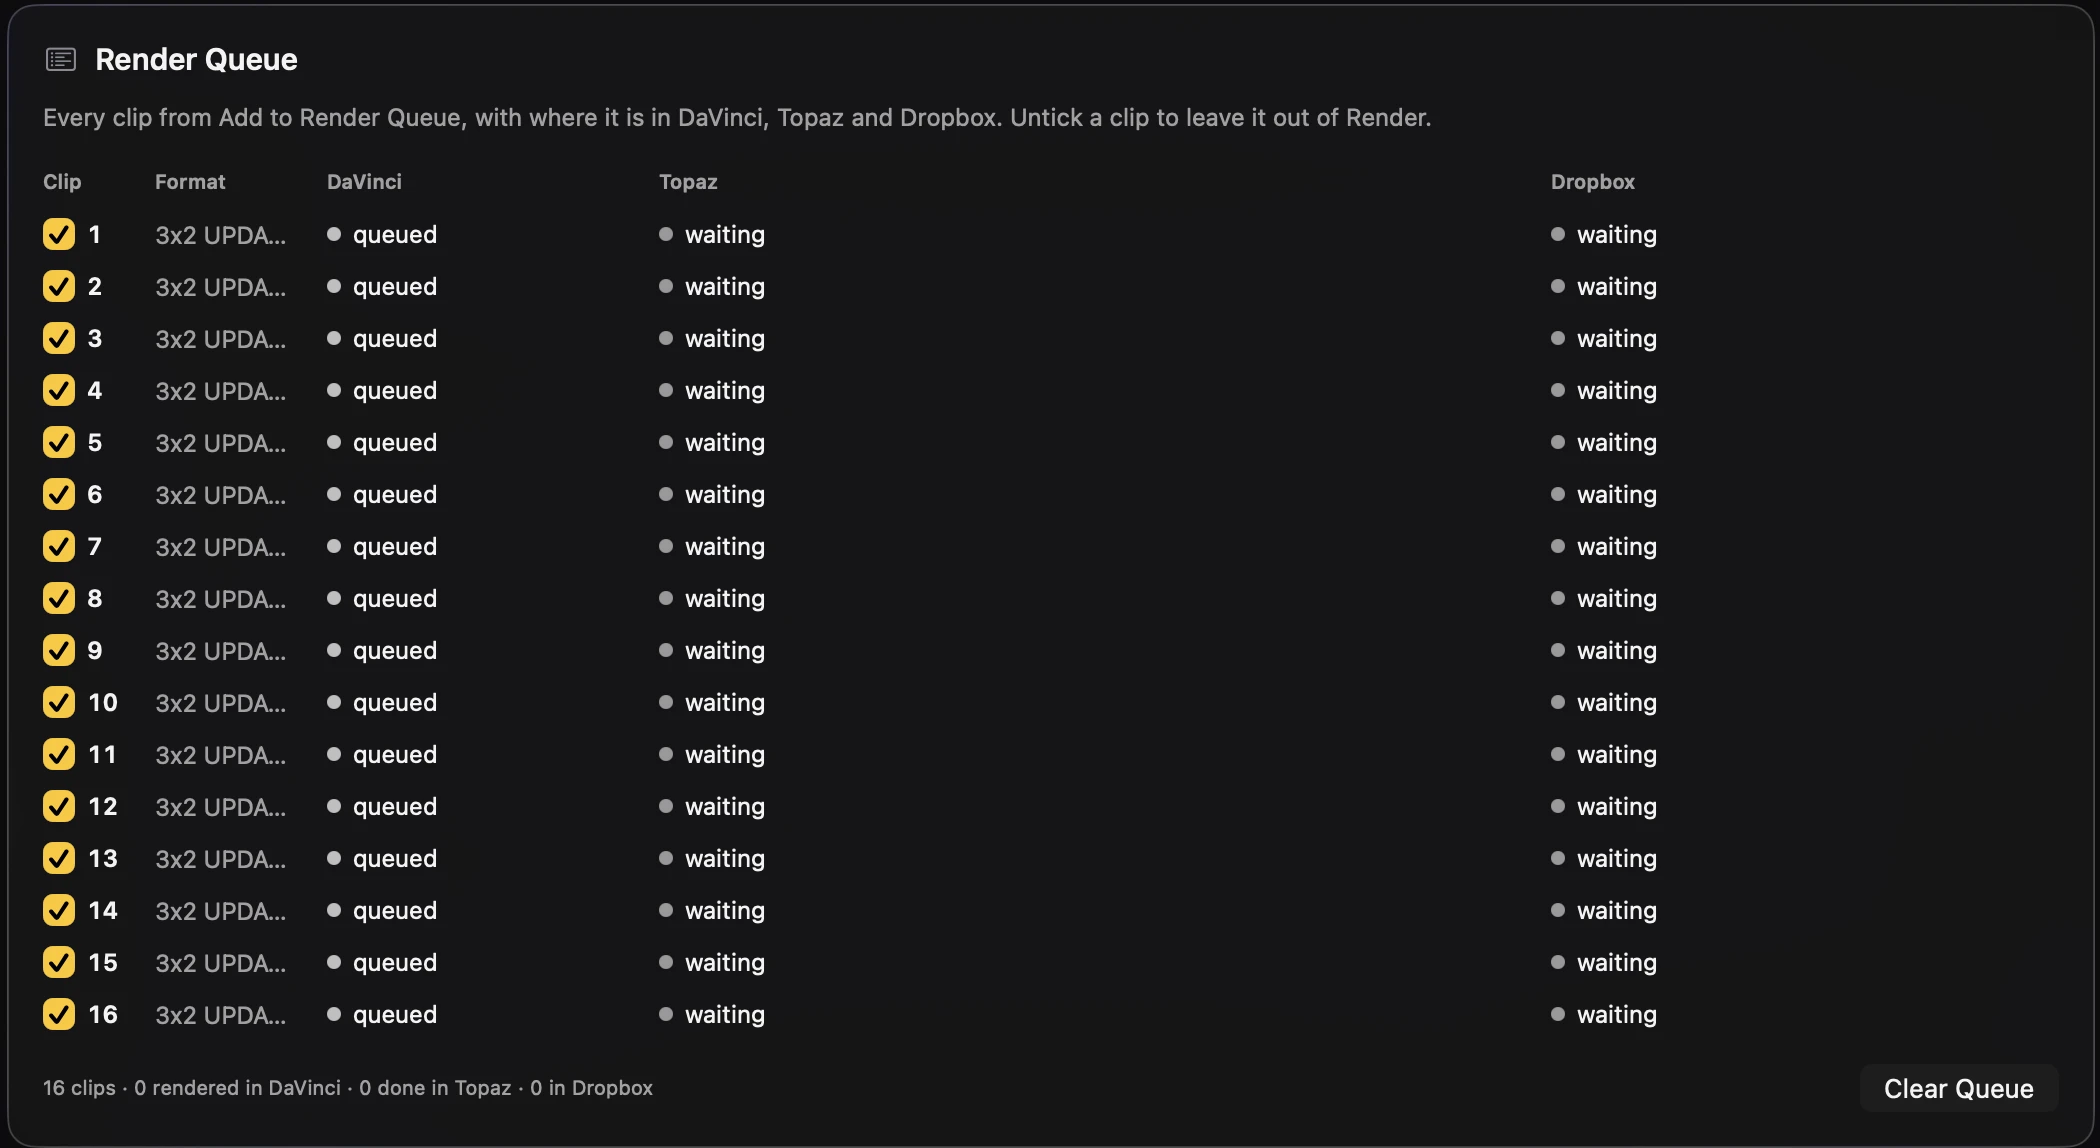
Each clip has a state for DaVinci, Topaz and Dropbox / Google Drive: waiting, queued, rendering, done or failed.

  1. Review the queue after Add to Render Queue.
  2. Untick any clip to leave it out of rendering.
  3. Use Stop Render or Stop Topaz to stop a stage. Clear Queue empties the list.

Roadie empties Resolve’s render queue when it starts. If Resolve crashes mid-render, Roadie can reopen it, reload the project and retry unfinished clips, up to three times.

Roadie render queue controls on MacView full-size screenshot ↗Link to this answer ↗
Editors & setup

Set up Premiere Pro beta

Premiere communicates through the Roadie Link panel. Resolve remains the main, fully tested editor.

  1. In Sync Setup choose Premiere Pro, then Install Premiere Link. The adjacent ? provides the installation steps.
  2. Quit and reopen Premiere.
  3. Open Window → Extensions → Roadie Link once and keep it open while Roadie works.
  4. For grading, use Add adjustment layer + LUT. The ROADIE GRADE layer is placed on V3 above the rough cut.

Auto Zoom is not yet supported in Premiere Pro.

Link to this answer ↗
Editors & setup

Final Cut Pro — in development

Final Cut Pro integration is in development and is not currently available.

No release date has been announced. Use DaVinci Resolve Studio or the Premiere Pro beta integration for current editor workflows.

Link to this answer ↗
More tools

Save templates and revisit past shows

All Shows keeps your nights together, with progress lights and a route back to where you left off.

  1. Open Go → All Shows (Shift-Cmd-0 on Mac). Choose a show or New Show.
  2. In Templates, use New from Current Setup to save drives, fps, sync engine, angles and priorities, grade, markers, presets and delivery settings.
  3. Use for a New Show to reuse a venue, tour or client setup.
Link to this answer ↗
More tools

Add a setlist and song markers

Use a setlist to name SONG markers in Resolve.

  1. Open Show → Setlist (Shift-Cmd-L on Mac).
  2. Import a .txt or .csv file, or paste the songs in order.
  3. Drag songs to reorder and choose Mark Songs in Resolve.
Link to this answer ↗
More tools

Useful Mac keyboard shortcuts

Use Help → Keyboard Shortcuts (Cmd-/) to see the shortcut window.

  1. Cmd-1 to Cmd-4: Ingest, Sync + Rough Cut, Edit Tools, Export. Cmd-O: open show. Cmd-L: Resolve Log.
  2. Shift-Cmd-I: import all ready. Shift-Cmd-K: check card health. Cmd-B: Build + Sync. Shift-Cmd-M: Redo Rough Cut.
  3. Shift-Cmd-H: highlights. Opt-Cmd-T: floating toolbar. Opt-Cmd-Z: undo last tool.
  4. Shift-Cmd-E: scan markers. Shift-Cmd-A: add to render queue. Shift-Cmd-R: render.

These are the Mac shortcuts. Windows is in development.

Link to this answer ↗
Troubleshooting

Why are cameras or clips missing after sync?

Start by checking the sync results rather than rebuilding the whole show.

  1. For Roadie Sync or Timecode, review Sync Results. Clips below Min confidence are left off the timeline.
  2. Check whether an angle was excluded with its x. Red priority dots only exclude a camera from the rough cut, not from sync.
  3. If MAIN MIX or angles are missing before the multicam step, the returned sync may be incomplete. Review Syncaila’s results or try Roadie Sync.
Link to this answer ↗
Troubleshooting

Roadie cannot reach Resolve

For “Please open DaVinci Resolve before starting,” check the editor connection first.

  1. Open DaVinci Resolve Studio and your project.
  2. Confirm Preferences → System → General → External scripting using is Local.
  3. Rerun Help → Setup Check, then try the operation again.
  4. If needed, open the Resolve Log with Cmd-L and use Send to Support.
Link to this answer ↗
Troubleshooting

The project feels laggy

A large full-set rough cut can make the editor less responsive.

  1. Lower Rough cut amount on Sync + Rough Cut and rebuild the rough cut.
  2. For a multicam-only workflow, turn the Rough Cut switch off. The multicam, grade, markers and social timelines are still built.
Link to this answer ↗
Troubleshooting

Export finds odd markers or no clips

Export needs pairs of blue timeline markers, not just green highlight markers.

  1. Check the selected export timeline is the one containing your markers.
  2. Place one blue marker at each clip’s start and one at its end, then Scan Markers again.
  3. Remove stray markers less than 3 seconds apart and resolve any unmatched final marker.
  4. For Highlight Finder, enable Also add blue in/out markers before finding highlights.
Link to this answer ↗
Troubleshooting

Collect logs and send a support report

Send to Support creates a bundle of logs, settings, Setup Check results and Roadie crash reports. It includes no footage or project files.

  1. Open the Resolve Log (Cmd-L) to review the failed operation.
  2. Choose Send to Support from the account menu and describe what happened.
  3. Click Create + Email. Roadie saves a ZIP on the Desktop and opens an email with it attached. Review it before sending.
Link to this answer ↗
More tools

Where does Roadie save my files?

Your show folder contains the footage, sync information and exports.

  1. RAW/<ANGLE>/ holds copied media, with roll subfolders when enabled, plus manifests and CSV reports.
  2. SYNC/ holds sync results, timecode settings and Syncaila round-trip AAF / XML.
  3. EXPORTS/<timeline>/ holds rendered clips numbered 1, 2, 3. PREMIERE/ and FCP/ hold editor projects and XML.
  4. On Mac, ~/Library/Application Support/Roadie/ holds shows, templates, Grades, Profiles and Resolve Logs. The newest log is latest.txt.
Link to this answer ↗
Purchase & trial

How do pricing and the trial work?

Buy once for $199 including all future updates, or subscribe for $19/month with updates while subscribed.

  1. The subscription starts with a 7-day free trial and requires a payment card.
  2. After 7 days it automatically renews at $19/month unless canceled.
  3. Checkout will be handled by Polar. This private site preview is not accepting payments yet.
Link to this answer ↗
GET IN TOUCH

Contact Roadie.

Questions, feedback, or help with your workflow? Write to Miles.

Opens your email app with a draft to miles@roadie.studio. Review and send it there.